Wednesday, October 30, 2013

Dark Night Card with Dana


Hi! Dana here today sharing a Halloween card today. I embossed a piece of patterned paper with the Large Vintage Girl Embossing Folder and then highlighted the embossing with Black Soot Distress Ink. I love how the design form the Large Vintage Girl Embossing Folder frames the card edge.


I created a frame for the owl using the Oval and Scalloped Oval Nesting Dies. I attached all the elements to this card with Foam Mounting Tape for a fun 3D effect!

Thanks for stopping by today!
~Dana

Couture Creations Supplies:
CO723447 Elegance Collection - Large Vintage Girl Embossing Folder
CO723044 Oval Nesting Dies
CO723045 Scalloped Oval Nesting Dies
CO721961 Foam Mounting Tape
CO723039 Paper Trimmer

Monday, October 28, 2013

Kromekote Christmas Card with Gloria

Hi! Gloria here with you today. WorldWin Papers has come out with a new line of cardstock called Kromekote. This cardstock collection contains foil, glossy, and glossy textured cardstock papers. The cardstock is a heavy weight, perfect for embossing and die-cutting. I know it may be early for Christmas, but I need to get a head start on my cards. Plus, look at this shimmery foil cardstock! It is perfect for the holidays!


I used the Kromekote Silver Foil cardstock for my card. I embossed the silver foil with the Couture Creations Cardinal's Wreath Embossing Folder, and then I gently rubbed the surface with a Sanding Block.


I used Copic markers to highlight just a few elements of the embossed image. I die-cut a small scrap of the silver foil cardstock with a mini tag die template, and then I stamped the sentiment on it with Staz-On Ink, which dries quickly on the glossy surface.


You can see here the "scratching" of the surface that happened when I gently buffed the raised images with a Sanding Block! It gives the card even more dimension.

Thanks for looking!

Couture Creations Supplies:
CO723599 Wrapped In Joy Collection - Cardinal's Wreath Embossing Folder
CO723060 Sanding Block

Other Supplies: WorldWin Papers: Kromekote Silver Foil, ColorMates Deep Emerald Isle, Deep Berry Red, Heritage White (inside); Die Template: Sweet and Sassy Stamps Mini Tags; Stamps: JustRite Deck the Halls; Ink: Tsukineko Staz-On Jet Black; Ribbon: Really Reasonable Ribbon; Markers: Copic R29, G16; Adhesive: Scor-tape, Scrapbook Adhesives by 3L 3D Foam Squares

Friday, October 25, 2013

Sparkle Card with Vicki Robertson


Hi! Vicki Robertson here with you today. I am gearing up for the Christmas holidays with my new embossing folders and die-cuts.  This clean and simple card is embellished with the NEW Couture Creations Wild Holly Embossing Folder.  I inked the edges of the embossed layer with Memento Desert Sand Ink and embellished the front with cuts from the Memory Box Snowflake Sprig Die-Cut.


The snowflakes are covered with Ranger Glue N' Seal and Distress Glitter to add the sparkle! Some lovely Seaspray Self-Adhesive Gemstones were the final touch.

Thanks for stopping by today!
~Vicki

Couture Creations Supplies:
CO723593 Wrapped in Joy Collection - Wild Holly Embossing Folder
CO721989 Seaspray Self-Adhesive Gemstones

Other Supplies: Cardstock: Core'dinations Neutrals; Snowflake Sprig Die-Cut: Memory Box; Matte Glue N' Seal: Ranger/Inkssentials; Clear Rock Candy Distress Glitter: Ranger/Tim Holtz; Small Classic Oval Die: Spellbinders; Small Scalloped Oval Die: Spellbinders; Warm Words Sentiment Stamp: Stampin' Up; Desert Sand Ink: Tsukineko/Memento; Bow Maker Tool: Craft-Dee BowZ; Other: Ribbon

Wednesday, October 23, 2013

Peace on Earth with Patti Hamil

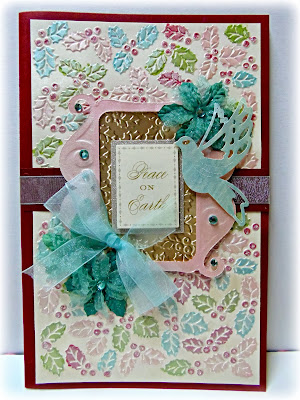
Hi! Patti here today sharing a technique that is easy, but beautiful, especially for holiday cardmaking or scrapbooking. I started out with one of the gorgeous Wrapped In Joy embossing folders. I chose the Champagne and Holly Embossing Folder because I wanted to color the little holly leaves  different colors for a festive feel.


Here are a couple of close-ups of the finished project.


First, I gathered supplies, the embossing folder, my trusty tweezers, markers and some gems.

I colored in the embossed leaves and berries with several light colors of markers. I used pink, blue, green and burgundy.


After coloring the design the magic starts! I then rubbed iridescent ink over the entire embossed image. It lightens the colors and adds just the right amount of shimmer!

 I used Aztec Gold Glitzin' Glamour to highlight the little berries.
This is a large card design, so I added an embossed strip across the two sections where the two embossed papers joined.

I thought a little bird would look perfect on this card, so I cut a piece of cardstock with the Dove of Peace Die and colored it with the same blue marker and Shimmers ink I used to color the embossed cardstock.


This is how it looked.


I used the Picture Frame Nesting Dies to frame my sentiment. I embossed a small piece of gold paper with the Champagne and Berries Embossing Folder to use behind the little frame as a backing.


I added a few matching blooms and some gems to finish the card. The result is a very striking card made with simple techniques. I hope you enjoyed this technique too!
 
Thanks for stopping by today!
~Patti

Couture Creations Supplies:
CO723606 Wrapped In Joy Collection -  Champagne and Holly Embossing Folder
CO723407 Endless Dreams Collection -  Dove of Peace Die
CO723215 Picture Frame Nesting Dies
CO721989 Seaspray Self-Adhesive Gemstones
CO721981 Aztec Gold Glitzin' Glamour


Monday, October 21, 2013

Peace Card with Pam Bray


Hi! Pam here today. Can you believe that the holidays are just around the corner? It is never to late to start thinking of making Christmas Cards, decorations or gifts. The Couture Creations NEW Wrapped in Joy Embossing Folder Collection is perfect for holiday crafts. Today I would like to share with you my non-traditional  "Peace Card" using the Peace and Joy Embossing Folder.


I started my card by running a 5" x 7" piece of white cardstock, that I cut on my Couture Creations Precision Trimmer, through my embossing machine.


I repeated the process with purple and blue cardstock and with some pretty striped patterned paper.


I love to fussy cut, so using my Sharp Point Scissors, that is what I did with the "Peace" portion from the blue cardstock and the striped piece of patterned paper.

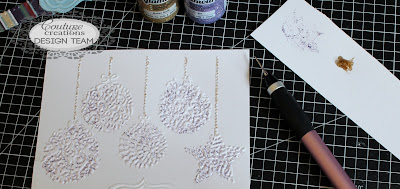
I rubbed Purple Glitzin' Glamour on the top of each of the embossed ornaments with my finger tip. Then, with a piece of scrap paper, I kissed each ornament to pick up the Glitzin' Glamour that may have gone off of the embossed image.

I then took the paper piercer from the Handheld Essentials Kit and, using the tip, placed a bit of the Aztec Gold Glitzin' Glamour over the top of each of the embossed ornament hangers.


I used my Sponge Dauber and a bit of Concord Grape Distress Ink to color the edges of my white card base prior to putting it together.


I layered all the pieces on top of my purple card base using Double-Sided Tape.


I added the "Peace" embossed image that I had previously fussy cut to the top of the striped strip with Foam Mounting Tape.


I placed a pretty bow on the top of each ornament.


I added Seaspray Self-adhesive Gemstones to the ends of the striped patterned paper.


Hugs, Pammejo

Couture Creations Supplies:
CO723594 Wrapped in Joy Collection - Peace and Joy Embossing Folder
CO721981 Aztec Gold Glitzin' Glamour
CO721972 Purple Glitzin' Glamour
CO721989 Seaspray Self-Adhesive Gemstones
CO721984 Double-Sided Tape
CO721963 Foam Mounting Tape
CO721957 Cutting Mat
CO721956 Sharp Point Scissors
CO723039 Precision Trimmer
CO721986 Handheld Essentials
CO723061 Sponge Daubers

Friday, October 18, 2013

Baby Keepsake Exploding Box by Jo Piccirilli

Hi everyone! Jo Piccirilli here today to share with you a little off-the-page project using lots of Couture Creations goodness.


Recently, the lady across the road had her 4th baby girl, so instead of a traditional present, I thought I would make a keepsake. This is an exploding box. There are lots of tutorials on Youtube on how to make these.

On the lid I have used the Alcyone Doily Die from the Royal Jewels Collection and the Tranquility Die from the Endless Dreams Collection along with some paper flowers.

On the outside of my box I have used the lower half of the Petite Fleur Embossing Folder from the Romantique Collection.  This folder was fantastic to use as it has a line of embossed dots that gave me a guideline for placing my pearls.

The inside of my box reveals a cake made with my Circle Nesting Dies.  I also used these and my Scallop Circle Nesting Dies to make the photo mats. 


Here is a quick run down on how to make the cake.

I cut two circles with my Circle Nesting Dies

Then, I cut two long strips.  The width will depend on how tall you want your cake to stand. Then, score two lines approximately 1cm in from each end.

Once you have scored your lines, you will then need to cut little triangles out. Just cut up to the score line. This makes it much easier to get your paper to bend around the circles you have just cut.


You can now pop a small amount of glue onto the circle and start and wrap the snipped strip around.  When you get to the end just snip off the extra length. You can now place these circles in the middle of your box.


Here is a closer look at the cake.


For the inside photo mats I have used the Large Damask Flourish Embossing Folder and the hearts from the Hearts Nesting Dies.


This was heaps of fun to make.  I hope I have inspired you to have a give a go at making your own exploding box. The designs are endless!

Until next time,
~Jo


Couture Creations Supplies:
CO723449 Elegance Collection - Large Damask Flourish Embossing Folder
CO723165 Romantique Collection - Petite Fleur Embossing Folder
CO723222 Fantasia Collection - Ivy Set Doily Dies
CO723213 Heart Nesting Dies
CO723040 Circle Nesting Dies
CO723041 Scallop Circle Nesting Dies
CO723046 Rectangle Nesting Dies
CO723112 Royal Jewels Collection - Alcyone Doily Die
CO723435 Endless Dreams Collection - Tranquility Decorative Die
CO723412 Endless Dreams Collection - Magical Butterfly Die

Wednesday, October 16, 2013

Dream Layout with Patti Hamil

Hi! Patti here today sharing a layout of my beautiful Granddaughter that I created using the Super Powder Puff Embossing Folder from the Couture Creations Fresh & Fun Collection. This design is such a super fun folder to play with. For this page I decided to add some color! I also added LOTS of layers!


Here is what I started with.


I colored in the designs with four pastel colored markers; green, pink, yellow and blue. I just used my Zig markers for this, which was really easy since the embossed area is so well defined.


Below you can see the cuts made with the Square and Scalloped Square Nesting Dies, which I layered underneath the photo using Foam Mounting Tape to add extra dimension to my page.


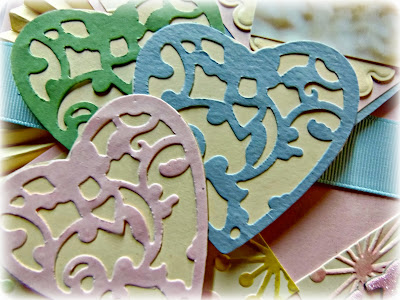
I used the Kaleidoscope Heart Die with three colors of cardstock. I backed each heart die-cut with cream cardstock to complement the little yellow fans I tucked behind each embossed square. I added Pink Diva Self-Adhesive Gemstones to the tip of each scalloped square framing my photo and some Crystalina and Pink Glitzin' Glamour to the flowers for some extra sparkle.


To finish the layout I added a tiny yellow rose at the bottom of each fan and a dream sticker sentiment.


This layout was so much fun to create and I hope you liked seeing it! Don't be afraid to add lots of layers and dimension to your pages. It really makes them come alive! Thanks so much for stopping by today!

~Patti

Couture Creations Supplies:
CO723441 Fresh & Fun Collection - Super Powder Puff Embossing Folder
CO723409 Endless Dreams Collection - Kaleidoscope Heart Die
CO723042 Square Nesting Dies
CO723043 Scallop Square Nesting Dies
CO721994 Pink Diva Self-Adhesive Gemstones
CO721971 Crystalina Glitzin' Glamour
CO721969 Pink Glitzin' Glamour
CO721961 Foam Mounting Tape

Monday, October 14, 2013

Couture Baubles by Tracey Cooley

Hi Creators, Tracey Cooley here! I was racking my brain trying to think of projects that I could do with my daughters that was quick and easy, so I grabbed my Couture Creations 12x12 Jolly Christmas Paper Pad and found these great baubles that I could cut out. With a bit of bling they came up like this...

To create this project all you need is a Couture Creations Jolly Christmas Paper Pad, Couture Creations Self-Adhesive Gemstones, fishing line, adhesives, Couture Creations Sharp Point Scissors and some ribbon.


Simply cut out a pair of baubles from the Couture Creations Jolly Christmas Paper Pad. Note: There are two sheets of each design included in the Jolly Christmas Paper Pad, so you will need to cut one bauble from each sheet to make a pair.


Take a small piece of fishing line and fold in half to form a loop and adhere 2 large Couture Creations Self-Adhesive Gemstones back to back over the fishing line. Repeat this process to make a row of 3 gemstones.

Add the fishing line to the back of a bauble with a glue dot and adhere the two baubles back to back with Couture Creations Double-Sided Tape.

Attach a ribbon bow to the top of each bauble and you have some really pretty Christmas Tree Decorations that are a quick and easy craft to do with your kids!

Thanks for dropping by today.
Keep on creating!


Couture Creations Supplies:
CO723549 Jolly Christmas Paper Pad
CO721994 Pink Diva Self-Adhesive Gemstones
CO721996 Crystal Self-Adhesive Gemstone
CO721985 6mm Double-Sided Tape 6mm
CO721955 Sharp Point Scissors
CO721957 Cutting Mat