Showing posts with label Wrapped In Joy Collection. Show all posts

Friday, January 3, 2014

Creating A Bow with Pam Bray


Hi! Pam here today. Have you ever wished you had a bow to place on your package? Well, fear not, because today I am going to share with you how easy it is to create a bow using your favorite Couture Creations Embossing Folder, some nice cardstock and a brad.


To begin, cut the following cardstock strips using your Couture Creation Precision Trimmer. I used a Color Core cardstock to make my bow.


Once you have cut all your strips, punch a hole in both ends of each strip using a hole punch or your Handheld Essentials Paper Piercer.


Run the cardstock strips through an embossing machine using the Moonlit Berries Embossing Folder.


 Lightly sand each cardstock strip with the Couture Creations Sanding Block.


Tip: Group the cardstock strips by size to keep them organized for placement onto the brad.


Start with the smallest cardstock strip, wrap it so the holes match up, and place the brad through the holes making sure the top of the brad is on the inside of the loop. Tip: Stick a pencil through the loop once the brad is in place to keep it secure while placing the rest of the strips onto the back of the brad.


Wrap each strip around your thumb...


...and place the looped strips onto the end of the brad. Once you have all the strips on the brad, fold down the ends of the brad to secure the strips in place.


Carefully twist the loops on the brad to arrange them, and just like that you have a beautiful bow! Have fun making them!

Hugs, Pammejo

Couture Creations Products: 
CO721957 Self Healing Cutting Mat
CO723039 Precision Trimmer
CO723060 Sanding Block
CO721986 Handheld Essentials - Piercing Tool
CO723596 Wrapped in Joy Collection - Moonlit Berries Embossing Folder 

Wednesday, December 25, 2013

Last Minute Christmas Card by Patti Hamil

Hi! Patti here today. If you are like me, you always forget someone on your Christmas card list. Then you remember at the last minute and you may not have any cards left. Well if this happens I have a quick solution!


I grabbed my Christmas Lyrics and Jolly Christmas Embossing Folders from the Couture Creations Wrapped in Joy Collection. I used some specialty cardstock that is shiny and perfect for Christmas!


I embossed the Jolly Christmas on a gold piece of cardstock a little smaller than 5x7 inches and embossed the Christmas Lyrics on a red piece of cardstock a little smaller than 4x6 inches. I then trimmed the edges. I inked the red cardstock with a gold ink to bring out the sentiment.


To finish the card I used Foam Mounting Tape for the sentiment and added a sparkly gold button with some green wax thread. Not elaborate, but still very pretty and enough to let some one know that you "did not" forget about them!


Thanks so much for stopping by for a visit!

Couture Creations Supplies:
CO723595 Wrapped in Joy Collection -  Jolly Christmas Embossing Folder
CO723607 Wrapped In Joy Collection -  Christmas Lyrics Embossing Folder

Friday, December 20, 2013

Tri-Fold Christmas Card by Bridget Louw

Hi! Couture Creations designer Bridget Louw here and I am so excited to show you this super easy tri-fold card to make using an assortment of gorgeous Couture Creations products.


Step 1: Place a 6 inch  x 12 inch piece of cardstock horizontally in your scoring tool. Score at 2 inches, 4 inches, 8 inches and 10 inches. The card measures 4 inches x 6 inches when closed.


Step 2: Turn the cardstock a ¼ turn. Along the long edge, measure in 2 inches. Cut a slit with a craft knife between the score marks at 2 inches and 10 inches. Repeat on the other long side.


Step 3: Fold card as pictured.


Step 4: To decorate the card, cut pieces of patterned paper to cover your base pieces.


I used the Oval and Scalloped Oval Nesting Dies and embossed the plain oval with the Sugarplum Ball Embossing Folder from the Wrapped in Joy Collection.


Step Five: Embellish the card as desired.

These cards are lots of fun to make and take almost no time at all. I hope you like my card and will try making it with the amazing product range from Couture Creations.

Couture Creations Supplies:
C0723603 Wrapped in Joy Collection -  Sugarplum Ball Embossing Folder
C0723044 Oval Nesting Dies
C0723045 Scalloped Oval Nesting Dies
C0721963 Foam Mounting Tape
C0721984 Double-Sided Tape
C0721957 Cutting Mat
C0721986 Handheld Essentials
CO723039 Precision Trimmer

Monday, December 16, 2013

Peace on Earth Card with Dana


Hi! Dana here today sharing a vintage Christmas card that I created using the Couture Creations Christmas Morning Embossing Folder. The beautiful embossed edge made an elegant frame for my card. I layered pieces of vintage newspaper and sheet music and a vintage postcard onto my embossed card base. I loved the image on the postcard and decided to play up the green and purple color palette for a non-traditional holiday card.


I topped my festive embellishment cluster with a stamped sentiment that I cut from a vintage book page. I just love the look of aged paper! I added some sparkle to the butterfly wings with Green Glitzin' Glamour Glitter Glue.


I finished my card with some decorative chipboard and a vintage inspired key.

Thanks so much for stopping by today! I wish you and yours all the best this holiday season!

Couture Creations Supplies:
CO723590 Wrapped in Joy Collection - Christmas Morning Embossing Folder
CO721978 Green Glitzin' Glamour Glitter Glue
CO723039 Precision Trimmer

Friday, December 13, 2013

Folded Christmas Tree Card by Bridget Louw


Hi! Couture Creations Designer Bridget Louw here today. I am so excited to show you this super easy Christmas card to make using an assortment of gorgeous Couture Creations products.


The card measurements are:
Cream Cardstock Embossed Panel:  6 ½ inches x 4 7/8 inches
Red Patterned Paper: 6 3/4 inches x 5 inches
Card Base: 10 ¼ inches x 6 7/8 inches, scored at 5 1/8 inches

Using the Joyful Wishes Embossing Folder, emboss the cream cardstock panel. Attach it to the red piece of patterned paper using Double-Sided Tape.


To make the Christmas Tree, using the Square Nesting Dies. Cut 4 squares, with the 4 largest square dies, using green patterned paper of your choice.


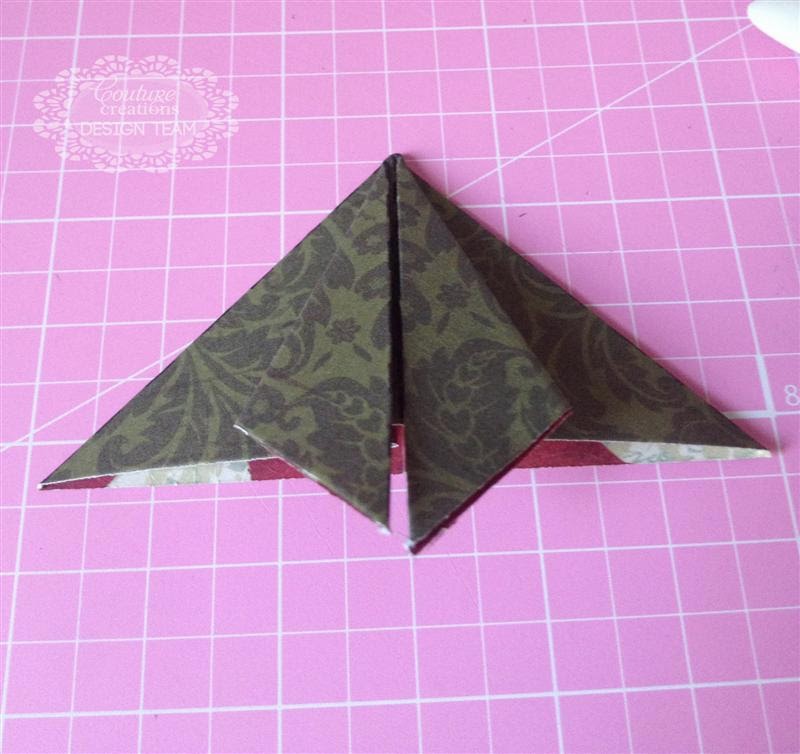
Fold the paper as per the diagram below. When you have folded all four squares push the point into the bottom of the pieces in ascending order. Cut a small piece of paper to simulate the tree trunk.


Stick your tree and trunk down onto the embossed layer.

Cut out a stamped sentiment with the small die from the Fleur de Frame Die Set and attach it on the card using Foam Mounting Tape.

Tie a piece of ribbon into a bow and adhere it to the top of the tree.

Thanks for stopping by today! I hope you like my card and will try making it with the amazing product range from Couture Creations!

Couture Creations Supplies:
C0723598 Wrapped in Joy Collection -  Joyful Wishes Embossing Folder
C0723050 Fleur de Frame Die
C0723042 Square Nesting Dies
C0721963 Foam Mounting Tape
C0721984 Double-Sided Tape
C0721957 Self Healing Cutting Mat
C0721986 Handheld Essentials
CO723039 Precision Trimmer

Wednesday, December 11, 2013

Christmas Snow Globe Card by Sue Smyth


Hi! Couture Creations Designer Sue Smyth here today. Its that time of year again when we like to make small gifts and special cards for those friends and family who have everything. This is a project that I have done many times before and it always looks stunning. Using an Acetate sheet, blue cardstock and Couture Creations Embossing folders, you can create your very own magical snow globe.


This time I have used Couture Creations Embossing folders to create a snowy scene suitable for any snow globe.


I have used loads of glitter and white cardstock along with a reindeer punch.


Use the template below, print out on an A4 sheet. Cut out the semicircle from blue cardstock and emboss with the Celebrate Embossing Folder.


Brush gesso over the embossed cardstock and spray with Dragonfly and Mallard Glimmer Mists.


Cut out the base from blue cardstock and emboss with the Celebrate Embossing Folder as well. Apply gesso and mist as above. Allow to dry 


Attach both ends, spray with spray adhesive and sprinkle with lots of  white glitter.


Attach base 1 to base 2 with masking tape.


Use template for globe, and cut on the fold to form the folded globe top. Swipe with gesso and allow to dry.


Emboss a small circle with the Reindeer Games Embossing Folder, wipe with gesso and spritz with Glimmer Mists. Highlight the image with Crystalina Glitzin' Glamour and allow to dry.


Hand-cut trees and punch out a reindeer to create a snowy scene. Cut a rough circle of white cardstock, scrunch up, spray with adhesive and sprinkle with glitter. Allow to dry. Glue the trees and deer onto this circle and attach to the snow globe base. 


Decorate the front of the snow globe with paper snowflakes and Seaspray Self-Adhesive Gemstones. Cut out the embossed message of your choice, from a piece of white cardstock embossed with the A Magical Time Embossing Folder, and ink with blue ink, scrunch a bit and glue to front. Use a white paint pen to apply small flakes around the edge of globe. Add pearlized sequin stars around the edge of globe and white fibers around the base.

Couture Creations Supplies:

CO723591 Wrapped in Joy Collection - Reindeer Games Embossing Folder
CO723588 Wrapped in Joy Collection -  A Magical Time Embossing Folder
CO723283 Elegance Collection - Celebrate Embossing Folder
CO721989 Seaspray Self-Adhesive Gemstones
CO721971 Crystalina Glitzin' Glamour
CO721987 Craft Knife
CO721957 Self Healing Cutting Mat


Monday, December 9, 2013

Embossed Christmas Tag with Pam Bray


Hi! Pam here today sharing a fun tag. This tag is such an easy one to make, and if you are like me, you will need a lot of tags for the holiday season so why not make them gorgeous?! To begin, gather a scrap of white cardstock, cut into a tag and run it through the Christmas Lyrics Embossing Folder.


Transform this plain white tag into a gorgeous colorful tag using Distress Inks and a Sponge Dauber.


Add a  piece of pretty patterned paper to the top and bottom of the tag, a cute sticker die-cut attached to the tag with some Foam Mounting Tape and some Crystal Self-Adhesive Gemstones.


Don't forget to add some pretty ribbon and some sparkly embellishments to finish the tag. I hope you enjoyed my quick tag! Place them on your Christmas and party packages to make them extra special.

Hugs, Pammejo

Couture Creations Supplies:
CO723607 Wrapped in Joy Collection - Christmas Lyrics Embossing Folder
CO721957 Self Healing Cutting Mat
CO721961 Foam Mounting Tape
CO721956 Precision Scissors
CO721984 Double Sided Tape
CO721996 Crystal Self-Adhesive Gemstones
CO723061 Sponge Daubers