Wednesday, July 31, 2013

Special Time by Patti Hamil

Hi! Patti Hamil here today sharing a layout about one of my very favorite memories, reading with my Daddy as a child. I had one book that was my favorite, "Jasper the Giraffe." It was about a giraffe that never got any mail like the rest of the animals. One day he broke his leg and was surprised when he got lots of "get well" wishes in the mail! I'm not sure if that's the actual book in the photo or not!


I used the Dazzling Doily Die from the Fantasia Collection. I thought it suited a heritage page. I started by cutting 4 blue doilies and 2 light yellow doilies. I then cut each doily in half.


I used the Fancy That Embossing Folder from the Sweet Dreams Collection and embossed a 12" strip of light yellow cardstock.


I used the Hyper Magical Embossing Folder from the Fresh and Fun Collection with light green cardstock and cut leaves out of it.


I cut a few circles of  random size and placed them on the page as well.

I matted my photo with a piece of cardstock that I embossed with the Fancy That Embossing Folder in yellow, with a solid blue mat behind it for the base.

I added faux stitching with my Zig markers, made a couple of blooms with the Daisy Nesting Dies and then put it all together! I some old alpha stickers for the title.

Thanks for stopping by today!

Couture Creations Supplies:
CO723217 Daisy Nesting Dies
CO723225 Fantasia Collection - Dazzling Doily Die
CO723442 Fresh and Fun Collection - Hyper Magical Embossing Folder
CO723208 Sweet Dreams Collection - Fancy That Embossing Folder
CO721988 Self Adhesive Gemstones - Sparkling

Monday, July 29, 2013

Friends Mini Album with Pam Bray


Hi! Pam Bray here today sharing one of my favorite projects, a mini album! They are one of my most favorite things to create and are a great way to make a few pictures last a lifetime. Today I'm sharing my Friends Mini Album. I created this album with a chipboard book that I had in my stash and the Couture Creations Large Vintage Girl Embossing Folder and Sunflower Nesting Dies. The Large Vintage Girl Embossing folder was the perfect size to embellish the front of the chipboard album!


I started by running the Large Vintage Girl Embossing Folder with salmon colored cardstock through my die-cut machine.


I then cut a bunch of sunflowers with the Sunflower Nesting Dies so I would be able to make my flowers.


When I was finished covering my album front and pages, I cut the excess paper off with my Craft Knife from the Handheld Essentials Kit and distressed the edges with the Sanding Block.

I also sanded the front of the embossed image with the Sanding Block to expose the white color core.

Taking my Couture Creations Precision Scissors, I cut around the frame.


I also cut out the inside of the embossed image so I could form a frame for the front of my album.


I inked all of the album pages and the frame with Distress Ink using a Couture Creations Sponge Dauber.

I added Couture Creations Double-Sided Tape to the cut out center so I could place a piece of pattern paper behind the frame.


I just love the Couture Creations Foam Mounting Tape, it gives great dimension and that is what I wanted to add to the front of my album.

To create the sunflowers from the Couture Creations Sunflowers Nesting Dies, ink them first, mist with water, wad them up and allow them to dry completely.

Once the flowers are completely dry, carefully open them up, layer them, and using your Couture Creations Handheld Essentials Paper Piercer, pierce a hole in the center and add a brad to hold the flowers together.


Here is a closer look at the flowers and the Large Vintage Girl frame I created.


Thanks for stopping by today!
Pammejo

Couture Creations Supplies:
CO723447 Large Vintage Girl Embossing Folder
CO723212 Sunflower Nesting Dies
CO721985 Double-Sided Tape
CO721963 Foam Mounting Tape
CO721956 Precision Scissors
CO721957 Cutting Mat
CO723060 Sanding Block
CO721986 Handheld Essentials
CO723061 Sponge Daubers

Friday, July 26, 2013

Pretty in Pink Card with Gloria Stengel

Hello everyone! It is Gloria Stengel with you today. I have used one of the new doily die templates to make a "pretty in pink" card for you.


1. Create a 5 x 5 inch white card.

2. Trim printed paper to 4 7/8 x 4 7/8 inches and attach to card front.


3. Using the Tatted Lace Doily Die (Fantasia Collection), cut and emboss pink cardstock. You may need to use the Piercing Tool to remove some of the tiny bits from the die cut. (My die did not come with injection foam. To aid the removal of the paper, I placed a sheet of wax paper between the die and my cardstock. This helped me remove the die cut shape from the paper without tearing it.)

4. Attach the square doily shape to the center of the card. Wrap a length of pink ribbon around the center of the panel and secure.


5. Using the Scallop Rectangle Nesting Dies, cut a rectangle from dark pink cardstock.

6. Stamp sentiment with black ink onto white cardstock. Line the Rectangle Nesting Die template over the stamped sentiment and tape down.

7. Cut and emboss both shapes.

8.Using Foam Mounting Tape, attach the sentiment stack to the center of the card, overlapping the ribbon.


9. Tie two bows, one from pink ribbon and one from dark pink ribbon and glue them to the right of the sentiment. Top with a paper rose.

10. Stamp a sentiment onto white cardstock. Use the oval die from the Picture Frame Nesting Die to cut out the sentiment. Using a Sponge Dauber and pink Distress Ink, add color to the sentiment. Tuck the sentiment under the right edge of the ribbon bows.


Thanks for joining me today!

Couture Creations Supplies:
CO723046 Rectangle Nesting Dies
CO723047 Scallop Rectangle Nesting Dies
CO723215 Picture Frame Nesting Dies
CO723223 Tatted Lace Doily Die
CO721956 Sharp Point Scissors
CO721986 Handheld Essentials - Piercing Tool, Embossing Tool
CO723061 Sponge Dauber
CO721965 Double-Sided Tape
CO721963 Foam Mounting Tape
CO721957 Cutting Mat

Wednesday, July 24, 2013

Spring Cards with Pam Bray


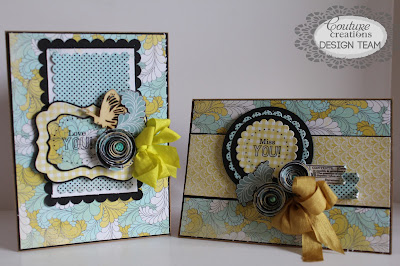
Hi! Pam Bray here today sharing how I created this fabulous card set using Couture Creations Nesting Dies!


My "Miss You" card is made with both the Circle Nesting Dies and the Scallop Circle Nesting Dies.


I ran cut with several dies at one time by trimming my paper to size and running them through my die-cut machine.


I cut a couple extra circles to use to create my flowers. 

Using Precision Scissors, I cut spiral patterns into two of the circle die-cuts.


Using Precision Tweezers, I started on the outside of the cut spiral circle and wrapped the paper around the tweezers, being careful not to pinch the sides as I was going around. Once wrapped, remove from tweezers and glue the middle of the flower to the bottom of the spiral.


After you have your pattern paper placed on to your card front, add your layered sentiment circles to the front of the card with Foam Mounting Tape and add your flowers to the top of the card. Add your bow, flags, fussy cut leaf and some pretty Self Adhesive Gemstones to the front of the card.


My "Love You" card was created by using the Vintage Rectangle Nesting Dies and the Scallop Rectangle Nesting Dies.


Again, I layered several of the nesting dies and paper on my die-cut platform together and cut them out.

Once I had layered my papers cut with the Vintage Rectangle Nesting Die, I took my ruler and the Craft Knife from the Handheld Essentials Kit, and cut my rectangle layers apart.


I placed the two pieces about and 1 1/4" apart and attached them to the front of my card base.


I adhered my scallop rectangles to the front of my card. I then added my sentiment sticker along with another of the beautiful flowers I made from the Circle Nesting Dies to finish my card. 

I hope I have inspired you to play with some of your Nesting Dies!

Hugs,

Couture Creations Supplies:
CO723040 Circle Nesting Dies
CO723041 Scallop Nesting Dies
CO723049 Vintage Rectangle Nesting Dies
CO723047 Scallop Rectangle Nesting Dies
CO721989 Self Adhesive Gemstones - Seaspray
CO721956 Precision Scissors
CO721961 Foam Mounting Tape
CO721954 Precision Tweezers
CO721986 Handheld Essentials

Monday, July 22, 2013

Handmade Daisys with Patti Hamil

Hello everyone! Patti Hamil here today. I wanted to share a layout with some handmade blooms that I created with the Daisy Nesting Dies.

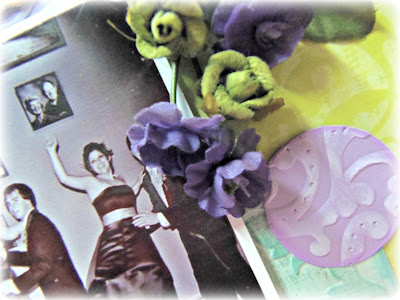
This is a page of our niece on her wedding day! I just love the fun photo capturing the excitement!


I used the Daisy Nesting Dies for these blooms. I made two different sizes. You can make them the size you want, you just need 2 smaller and 3 larger daisy shapes. After cutting, use a Sponge Dauber and ink the center with a little darker ink and snip slightly between each petal. Next, use a Piercing Tool to make a hole in the center of each daisy. Attach the layers of petals together with a brad. Spritz well with water and carefully fold each layer up toward the brad, gathering in the center. Your bloom will look like the one below. Set aside to dry.


Next, use a Piercing Tool to carefully pull apart each layer of petals. Be careful to prevent tearing as some sections are bunched up really tightly.


Once the petals are separated, remove the brad.


Layer the petals and attach with the adhesive of your choice. I used a white glue on mine.


Here is a closeup of a finished bloom. You don't need a center, they look more natural left the way they are!


For my background, I embossed two pieces of aqua colored patterned paper with the Large Damask Flourish Embossing Folder. I embossed a solid lavender paper with the Extra Confetti Embossing Folder and then cut the paper into circles.

Here you see some closeups of the detail of this.


I used Foam Mounting Tape to raise the smaller embossed circles for some added dimension. I really like how the intricate patterns of the embossing folders are so visible. These are great folders!
I hope you have enjoyed this tutorial on making blooms. You can play around and get lots of different looks with this technique! 

I appreciate you stopping by!
Couture Creations Supplies:
CO723217 - Daisy Nesting Dies
CO723449 - Elegance Collection - Large Damask Flourish Embossing Folder
CO723287 - Elegance Collection - Extra Confetti Embossing Folder
CO721992 - Self Adhesive Gemstones - Blue Iceberg
CO723061 - Sponge Dauber
CO721986 - Handheld Essentials - Piercing Tool
CO721965 - Foam Mounting Tape - 18mm x 50m

Friday, July 19, 2013

Engineering Sound with Dana Tatar


Hi! Dana Tatar here for CSW Distributors today sharing a music themed layout. I used the Couture Creations Uber Embossing Folder, from the Fine Designs Collection, on foil and cardstock on this page. I LOVE the vector diagram design on this folder! I though of my husband when I saw this design. He's an engineer by day and plays in a rock band at night, and was the inspiration behind this page.


I used alcohol and archival inks on this piece of embossed foil to add color and a bit of grunge. I highlighted several of the circles with metal studs.

 
I used a set of nesting dies to cut several eyelet circles from Core'dinations Cardstock, which I then embossed with the Uber Embossing Folder. I lightly sanded and inked the raised pattern before embellishing.


My husband is always swapping out broken parts from his guitar amps and the spoils are all mine!


I started this piece by cutting up and washing an empty coffee bag.  The foil liner yields a fantastic embossed impression and is almost impossible to tear.  This is my material of choice for all my embossed foil pieces.


I added color to this foil piece with Alcohol Inks. I randomly colored small areas with Lettuce, Terra Cotta and Butterscotch for an aged rusty feel.  I then filled in the remaining areas with Stream. I didn't worry about complete coverage here because I liked the look of some silver foil peeking through the color.


To help make the embossed areas on this foil piece pop, I lightly applied black Archival Ink to the foil by dragging the pad over the raised areas.


I love the rusty aged look!  Perfect for a grungy rock and roll layout!


I dressed up my Core'dinations Cardstock eyelet circles with the Uber Embossing Folder.  I then sanded and inked the raised areas before adding metal studs and paper stars.

Thanks so much for stopping by today!  I hope I have inspired you to use embossing folders and dies to make some unique embellishments for your scrapbook layouts!

Couture Creations Supplies:
CO723257 - Fine Designs - Uber Embossing Folder