Showing posts with label Sponge Dauber. Show all posts

Friday, March 28, 2014

Peacock Delight Projects by Adriana Bolzon


Hi! Couture Creations Designer Adriana Bolzon here today sharing how I create my two projects that are featured on the cover of the latest issue of the Couture Creations Creative Inspiration Magazine.

Peacock Pride Instructions

Roughly hand-draw the head and body of a peacock on Dark Blue cardstock. Cut out the figure.

Ink the edges and shadow highlights of the neck and the eye of peacock with a black inkpad and a Sponge Dauber. Highlight the features of the eye and face of the peacock with a fine white pen.

Cut small strips of Orange cardstock and use them to create a crown on the head of peacock. Cut a small beak from Orange cardstock and glue to the end of the peacock face. Place Crystal and Green Envy Self-Adhesive Gemstones to the head of peacock as shown in photograph. Highlight areas with a white pen as shown. Add a Moonlight Self-Adhesive Pearl to the center of the peacock eye.


Punch an assortment of small oval shaped pieces (you can use a small oval nesting die) and leaves from Lime Green and Ocean Blue cardstock. Ink the edges of the oval shapes and leaves with black ink and a Sponge Dauber.

Secure the oval shapes and leaves to the upper part of the body of the peacock with 3D Foam Dots,
layering shapes on top of each other. Place Crystal Self-Adhesive Gemstones on top of the punched shapes.

Peacock Feather Instructions


Cut 25 feathers from both Lime Green and Ocean Blue cardstock using the Peacock Delight Decorative Die.


Place one peacock feather die-cut on top of another peacock feather die-cut, slightly off center, and adhere with glue. Alternate the color of feather on the top.


Use a Sponge Dauber to apply black ink to the edges of each feather. Apply Crystalina and Green Glitzin' Glamour Glitter Glue down the center of each double-layered peacock feather. Let dry. Repeat the above process for each peacock feather. You will require around 25 doubled layered feathers to complete this project.


To create the background of the project, place a stencil on top of black cardstock and gently apply white ink over the stencil using a Sponge Dauber.

Place and adhere the body of the peacock on the black cardstock with 3D Foam Dots. Adhere 3D Foam Dots or Foam Mounting Tape underneath each feather. Arrange clusters of feathers as shown.
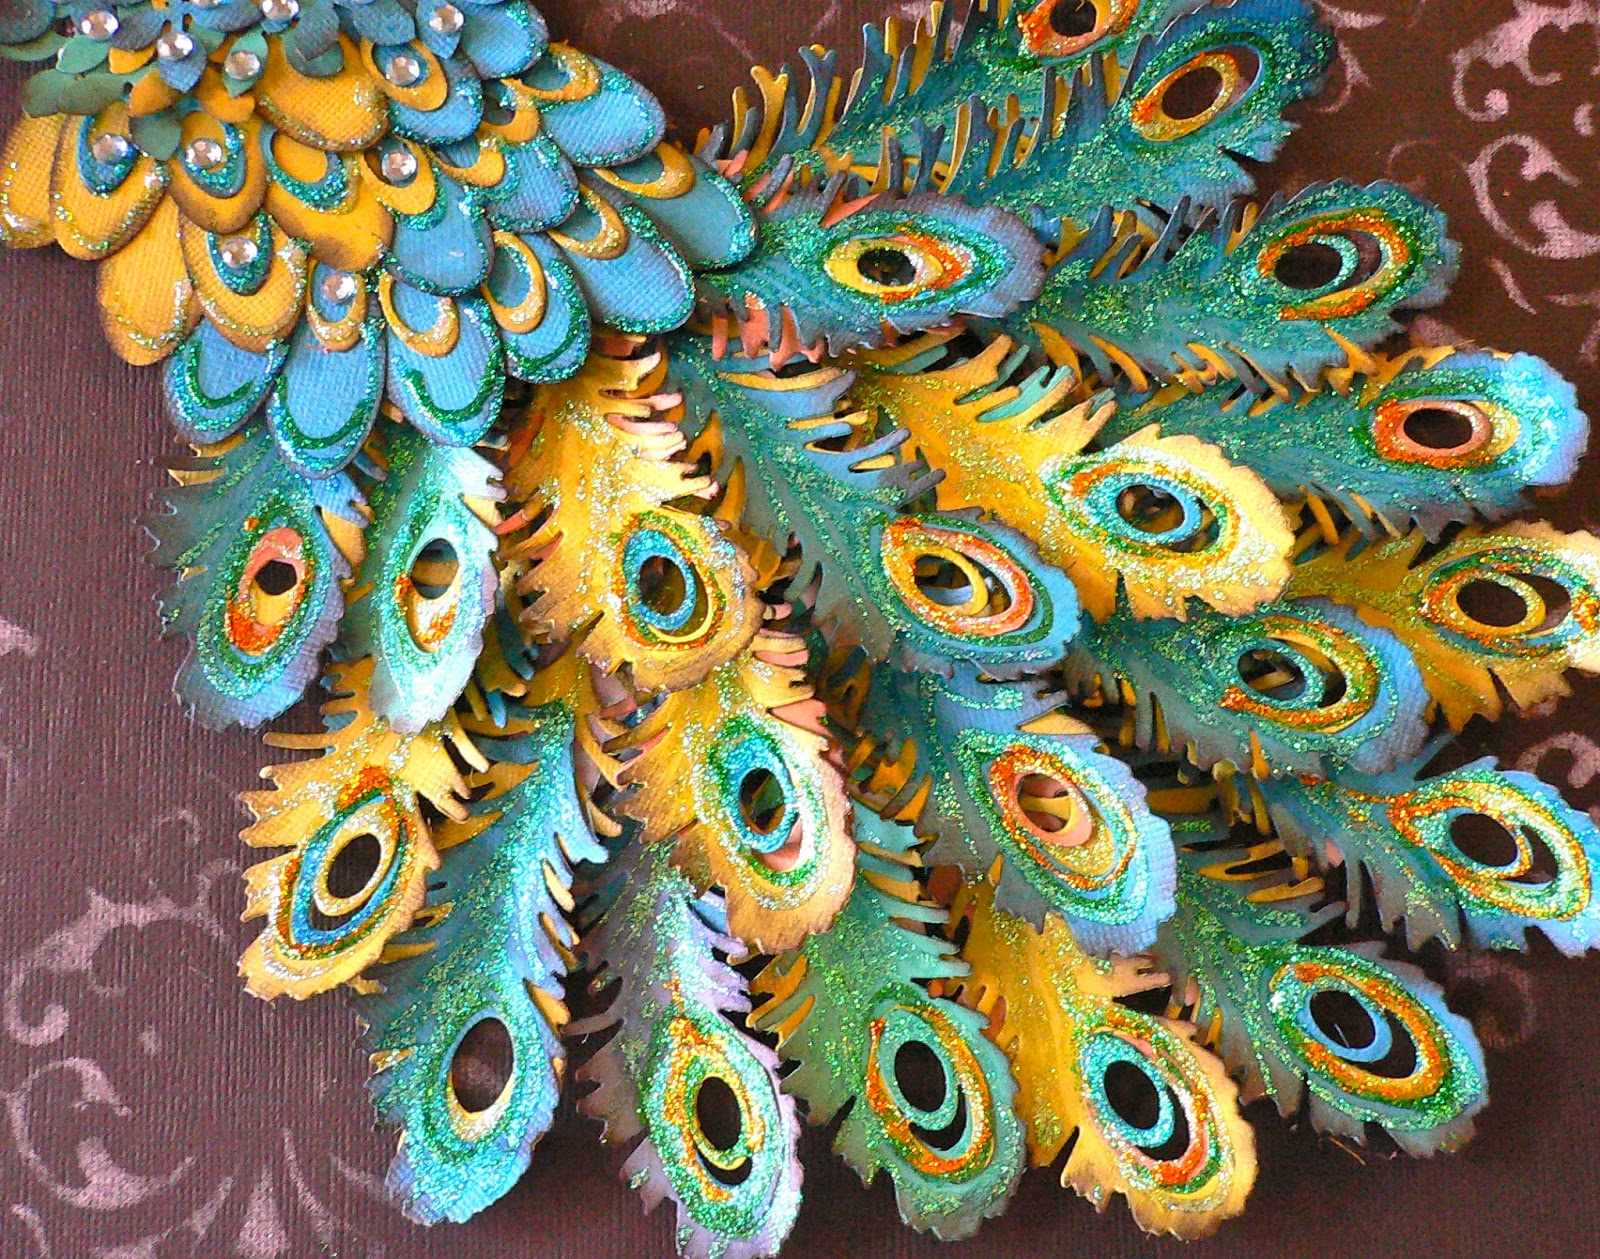


Highlight the edges of the feathers with Green, Gold and Crystalina Glitzin' Glamour Glitter Glue. Let dry.

Couture Creations Supplies - Peacock Pride
CO723707 Glamour Days Collection - Peacock Delight Decorative Die
CO721996 Crystal Self-Adhesive Gemstones
CO721991 Green Envy Self-Adhesive Gemstones
CO721978 Green Glitzin' Glamour Glitter Glue 
CO721971 Crystalina Glitzin' Glamour Glitter Glue
CO721976 Gold Glitzin' Glamour Glitter Glue
CO723780 Foam Mounting Tape
CO723623 Sponge Daubers

Other Supplies: Cardstock, Stencil; Leaf Punch; Oval Punch; Ink; White Pen


Peacock Mask


Peacock Mask Instructions

Use Mod Podge to adhere torn pieces of vintage music paper to a plastic mask. Let dry.

Adhere lace trim and Seaspray and Vintage Gold Self-Adhesive Gemstones to the top section of mask as shown below.


Create 10 doubled layered peacock feathers using the same technique shown in the step-by-step above for the Peacock Pride project.

Arrange a cluster of bird feathers and paper peacock feathers and adhere to each end of mask with Double Sided Tape and 3D Foam Dots.


Create bows with sheer ribbon and layered blue silk flowers with a pearl brad center. Adhere these clusters to each side of the mask.

Create a background with a stencil and a white inkpad, attach the mask to background.


Couture Creations Supplies - Peacock Mask
C0723707 Glamour Days Collection - Peacock Delight Decorative Die
C0721996 Crystal Self-Adhesive Gemstones
C0721990 Vintage Gold Self-Adhesive Gemstones
C0723780 3D Foam Dots
C0721963 Foam Mounting Tape
C0721983 Doubled Sided Tape
C0723623 Sponge Daubers

Thanks for looking!
Cheers, Adriana


Thursday, February 6, 2014

Live Your Life Out Loud Card by Adriana Bolzon


Hello there everyone! Couture Creations Designer Adriana Bolzon here today sharing a card I created with two of the latest dies from the Madeline and Secret Treasures Collections.


The gorgeous doily in the background is created with the Les Fleurs Doily Die. I inked the edges with brown ink and a Sponge Dauber.


The floral cluster was created with the Aurora Vine Die (leaves) and the Retro Flowers Die (pink blooms). I cut several flowers using the Retro Flowers Die, curled the edges of the petals over with a very thin stick, glued them together and placed a Cafe Creme Self-Adhesive Pearl in the center of each flower.

Thanks for stopping by today!

Couture Creations Supplies:
CO723243 Madeline Collection - Les Fleurs Doily Die
CO723530 Secret Treasures Collection - Aurora Vine
CO723524 Secret Treasures Collection - Retro Flowers
CO721999 Cafe Creme Self-Adhesive Pearls
CO721962 Foam Mounting Tape
CO723623 Sponge Dauber

Wednesday, September 18, 2013

Quick and Easy Embossing Designs by Gloria Stengel

Hello! It is Gloria with you today. I am sharing a "quick and easy" card! When I collect a new embossing folder, the first thing I do is emboss it, using whatever cardstock I have close by. I also will emboss various types of cardstock to get a feel for how the impression will look with different weights and textures of cardstock. As a result, I collect stacks of embossed patterns! It is easy to pair these embossed prints together to make quick cards!


To create this card follow these steps:

1. Make a 5 1/2 x 4 1/4 inch card from rust cardstock. Set aside.

2. Emboss metallic cardstock with the Extra Loren Embossing Folder from the Couture Creations Elegance Collection.

3. Using a Couture Creations Sponge Dauber, rub the metallic embossed cardstock with rust ink. Trim the panel to slightly smaller than the card front.

4. Emboss green cardstock with the Poetry Embossing Folder from the Couture Creations Elegance Collection.

5. Using a Couture Creations Sponge Dauber, rub the green embossed cardstock with green ink. Trim the panel to 4 3/4 x 3 inches and mat with rust cardstock. Attach to the left side of the embossed metallic cardstock.
 

6. Stamp a sentiment with brown ink and die cut with a Couture Creations Rectangle Nesting Die.

7. Mat the sentiment with a rectangle die cut with the Couture Creations Scallop Rectangle Nesting Die. Attach the sentiment to the other panels with Foam Mounting Tape.

8. Wrap twine around the embossed panels and secure. Attach the panels to the card front.

9. Tie a button onto the card with more twine.

You can create this same card with various embossed panels and stamps! Take a rainy afternoon to replenish your card stash with some quick and easy cards....using embossing folders, of course!

Thanks for looking!  
~Gloria (Scraps of Life)
 
Couture Creations Supplies:
CO723445 Elegance Collection - Extra Loren Embossing Folder
CO723285 Elegance Collection - Poetry Embossing Folder
CO723046 Rectangle Nesting Dies
CO723047 Scallop Rectangle Nesting Dies
CO721963 Foam Mounting Tape
CO721965 Double-Sided Tape
CO721956 Sharp Point Scissors
CO721957 Cutting Mat
CO723039 Precision Trimmer
CO723061 Sponge Daubers

Other: Cardstock: WorldWin Papers ColorMates Smooth and Silky Deep Terra-Cotta, ColorMates Original Light Totally Tan, Elan Metallics; Mocha Ink: Clearsnap, Colorbox Archival Tree Frog, Clearsnap Colorbox Chalk Burnt Sienna, Tsukineko Memento Rich Cocoa; Stamp: Stampin' Up; Twine: May Arts; Button: Unknown; Adhesive: Glue Dots Adhesive Dots

Monday, September 16, 2013

Song of the Sea Card with Dana


Hi! Dana here today sharing a card that features a piece of embossed aluminum today. I feel at home when I'm on the beach, and that was my inspiration for my project. I embossed a piece of aluminum with the Couture Creations Cheerful Embossing Folder, from the Elegance Collection, and added color with Lindy's Stamp Gang Madonna Robe Blue Gold Two-Toned Embossing Powder.


Step One: Add watermark ink directly to the inside of the Cheerful Embossing Folder, slip the piece of aluminum inside the folder and run the folder through an embossing machine. Remove the aluminum from the folder, sprinkle with embossing powder and heat to set. Note: If you are using an aluminum sheet, the metal will become very hot upon heating, so please be careful! Depending on which side of the embossing folder carried the watermark ink, either the embossed or debossed area will be colored.


Here is what my piece of aluminum looked like after embossing.


Step Two: Stamp a sentiment onto a piece of cardstock. Cut the sentiment from the cardstock with the Couture Creations Scalloped Oval Nesting Die. Apply ink to the sentiment using a Sponge Dauber and the metal die as a guide.


Step Three: Select a piece of patterned paper for the card base and randomly apply circles and stars from the Pink Paislee Luxe Rub-Ons Set.


Step Four: Assemble the base of the card. Add some chipboard pieces from the Pink Paislee Luxe Circles Set across the center of the card.


Step Five: Add an image, the stamped sentiment from Step Two and other embellishments to finish the card.

Thanks so much for stopping by today!

Couture Creations Supplies:
CO723282 Elegance Collection - Cheerful Embossing Folder
CO723045 Nesting Dies - Scallop Oval
CO723061 Sponge Dauber
CO721963 Foam Mounting Tape

Wednesday, September 11, 2013

Happy Birthday Layout with Pam


Hi! Pam here today sharing a Happy Birthday layout I made using some fabulous dies and embossing folder from Couture Creations.  I love the embossing folders! They emboss so beautifully, the deep etched design of each folder yields a fantastic impression.


The "Happy Birthday" strip was part of a patterned paper I selected for this page. I wanted to use the Couture Creations Fudge Embossing Folder with it, so I first ran the strip through my embossing machine and then flipped it over and ran it through my embossing machine on the other side.


Once I had my strip embossed, I used my Couture Creations Sponge Dauber and a bit of ink to go over the top of it. I thought it helped to pop the embossed image.

After I had my distressing done on the Happy Birthday Strip, I added it to the top of my layout using Couture Creations Double-Sided Tape and placed some embellishments onto the page with Couture Creations Foam Mounting Tape.

I used the same technique on my rectangular pattern papers prior to placing them on my page.


Using the Couture Creations Sunflower Nesting Dies and Circle Nesting Dies, I made a layered piece to place under my photo.  


 It is an easy way to make your photo pop!


Hugs, Pammejo
Couture Creations Supplies:
CO723047 Nesting Dies - Scallop Rectangles
CO723040 Nesting Dies - Circles
CO723212 Nesting Dies - Sunflowers
CO723275 Fresh and Fun Collection - Fudge Embossing Folder
CO723525 Endless Dreams Decorative Dies - Hanging Sign
CO721994 Pink Diva Self Adhesive Gemstones
CO721956 Sharp Point Scissors
CO721961 Foam Mounting Tape
CO721986 Handheld Essentials
CO721957 Cutting Mat
CO723061 Sponge Daubers

Saturday, August 31, 2013

Wild Holly Card with Tracey

Hi Creators! Tracey Cooley here with you today sharing a card I created with the Couture Creations Wild Holly Embossing Folder from the NEW Wrapped in Joy Collection. This embossing folder collection really captures the spirit of Christmas and each folder gives a clean, crisp, embossed impression. I especially like the Wild Holly Embossing Folder and I hope you like it too!


I started this card with a 5"x7" brown card base. I then cut and adhered a green mat measuring 4.75"x 6.75" and a white piece of cardstock, embossed with the Wild Holly Embossing Folder, measuring 4.5"x6.5" on top of the card base.


Using a Couture Creations Sponge Dauber, ink the embossed cardstock with red ink leaving the center of the card its original color. Then work in some chocolate brown ink and finally some olive green ink. Adhere to your card base. Tip: Keep working the inks until you achieve a nice blended look that fades from red to olive.


Bring some nature into this card by finding an interesting looking stick from your garden and painting it with brown acrylic paint. Let dry.


Wrap the branch with white netting and secure it to the branch with some hot glue. Apply spray adhesive to the netting and sprinkle with white glitter. Attach the branch embellishment to the card base with hot glue.


Cut some holly and a small wren from the Couture Creations Vintage Christmas Paper Pad and attach to your branch. Pop a flourish behind your bird using the Couture Creations Endless Dreams Decorative Die Moments In TimeTip: Cut the Moments In Time die-cut flourish in half and place both pieces exactly where you like them. Voila!

Thanks for stopping by today! Keep On Creating!

Couture Creations Supplies:
CO723434 Endless Dreams Collection - Moments In Time Die
CO723593 Wrapped In Joy Collection - Wild Holly Embossing Folder
CO723551 Vintage Christmas Paper Pad
CO723061 Sponge Dauber

Monday, July 29, 2013

Friends Mini Album with Pam Bray


Hi! Pam Bray here today sharing one of my favorite projects, a mini album! They are one of my most favorite things to create and are a great way to make a few pictures last a lifetime. Today I'm sharing my Friends Mini Album. I created this album with a chipboard book that I had in my stash and the Couture Creations Large Vintage Girl Embossing Folder and Sunflower Nesting Dies. The Large Vintage Girl Embossing folder was the perfect size to embellish the front of the chipboard album!


I started by running the Large Vintage Girl Embossing Folder with salmon colored cardstock through my die-cut machine.


I then cut a bunch of sunflowers with the Sunflower Nesting Dies so I would be able to make my flowers.


When I was finished covering my album front and pages, I cut the excess paper off with my Craft Knife from the Handheld Essentials Kit and distressed the edges with the Sanding Block.

I also sanded the front of the embossed image with the Sanding Block to expose the white color core.

Taking my Couture Creations Precision Scissors, I cut around the frame.


I also cut out the inside of the embossed image so I could form a frame for the front of my album.


I inked all of the album pages and the frame with Distress Ink using a Couture Creations Sponge Dauber.

I added Couture Creations Double-Sided Tape to the cut out center so I could place a piece of pattern paper behind the frame.


I just love the Couture Creations Foam Mounting Tape, it gives great dimension and that is what I wanted to add to the front of my album.

To create the sunflowers from the Couture Creations Sunflowers Nesting Dies, ink them first, mist with water, wad them up and allow them to dry completely.

Once the flowers are completely dry, carefully open them up, layer them, and using your Couture Creations Handheld Essentials Paper Piercer, pierce a hole in the center and add a brad to hold the flowers together.


Here is a closer look at the flowers and the Large Vintage Girl frame I created.


Thanks for stopping by today!
Pammejo

Couture Creations Supplies:
CO723447 Large Vintage Girl Embossing Folder
CO723212 Sunflower Nesting Dies
CO721985 Double-Sided Tape
CO721963 Foam Mounting Tape
CO721956 Precision Scissors
CO721957 Cutting Mat
CO723060 Sanding Block
CO721986 Handheld Essentials
CO723061 Sponge Daubers