Showing posts with label Glitzin' Glamour. Show all posts

Friday, March 28, 2014

Peacock Delight Projects by Adriana Bolzon


Hi! Couture Creations Designer Adriana Bolzon here today sharing how I create my two projects that are featured on the cover of the latest issue of the Couture Creations Creative Inspiration Magazine.

Peacock Pride Instructions

Roughly hand-draw the head and body of a peacock on Dark Blue cardstock. Cut out the figure.

Ink the edges and shadow highlights of the neck and the eye of peacock with a black inkpad and a Sponge Dauber. Highlight the features of the eye and face of the peacock with a fine white pen.

Cut small strips of Orange cardstock and use them to create a crown on the head of peacock. Cut a small beak from Orange cardstock and glue to the end of the peacock face. Place Crystal and Green Envy Self-Adhesive Gemstones to the head of peacock as shown in photograph. Highlight areas with a white pen as shown. Add a Moonlight Self-Adhesive Pearl to the center of the peacock eye.


Punch an assortment of small oval shaped pieces (you can use a small oval nesting die) and leaves from Lime Green and Ocean Blue cardstock. Ink the edges of the oval shapes and leaves with black ink and a Sponge Dauber.

Secure the oval shapes and leaves to the upper part of the body of the peacock with 3D Foam Dots,
layering shapes on top of each other. Place Crystal Self-Adhesive Gemstones on top of the punched shapes.

Peacock Feather Instructions


Cut 25 feathers from both Lime Green and Ocean Blue cardstock using the Peacock Delight Decorative Die.


Place one peacock feather die-cut on top of another peacock feather die-cut, slightly off center, and adhere with glue. Alternate the color of feather on the top.


Use a Sponge Dauber to apply black ink to the edges of each feather. Apply Crystalina and Green Glitzin' Glamour Glitter Glue down the center of each double-layered peacock feather. Let dry. Repeat the above process for each peacock feather. You will require around 25 doubled layered feathers to complete this project.


To create the background of the project, place a stencil on top of black cardstock and gently apply white ink over the stencil using a Sponge Dauber.

Place and adhere the body of the peacock on the black cardstock with 3D Foam Dots. Adhere 3D Foam Dots or Foam Mounting Tape underneath each feather. Arrange clusters of feathers as shown.
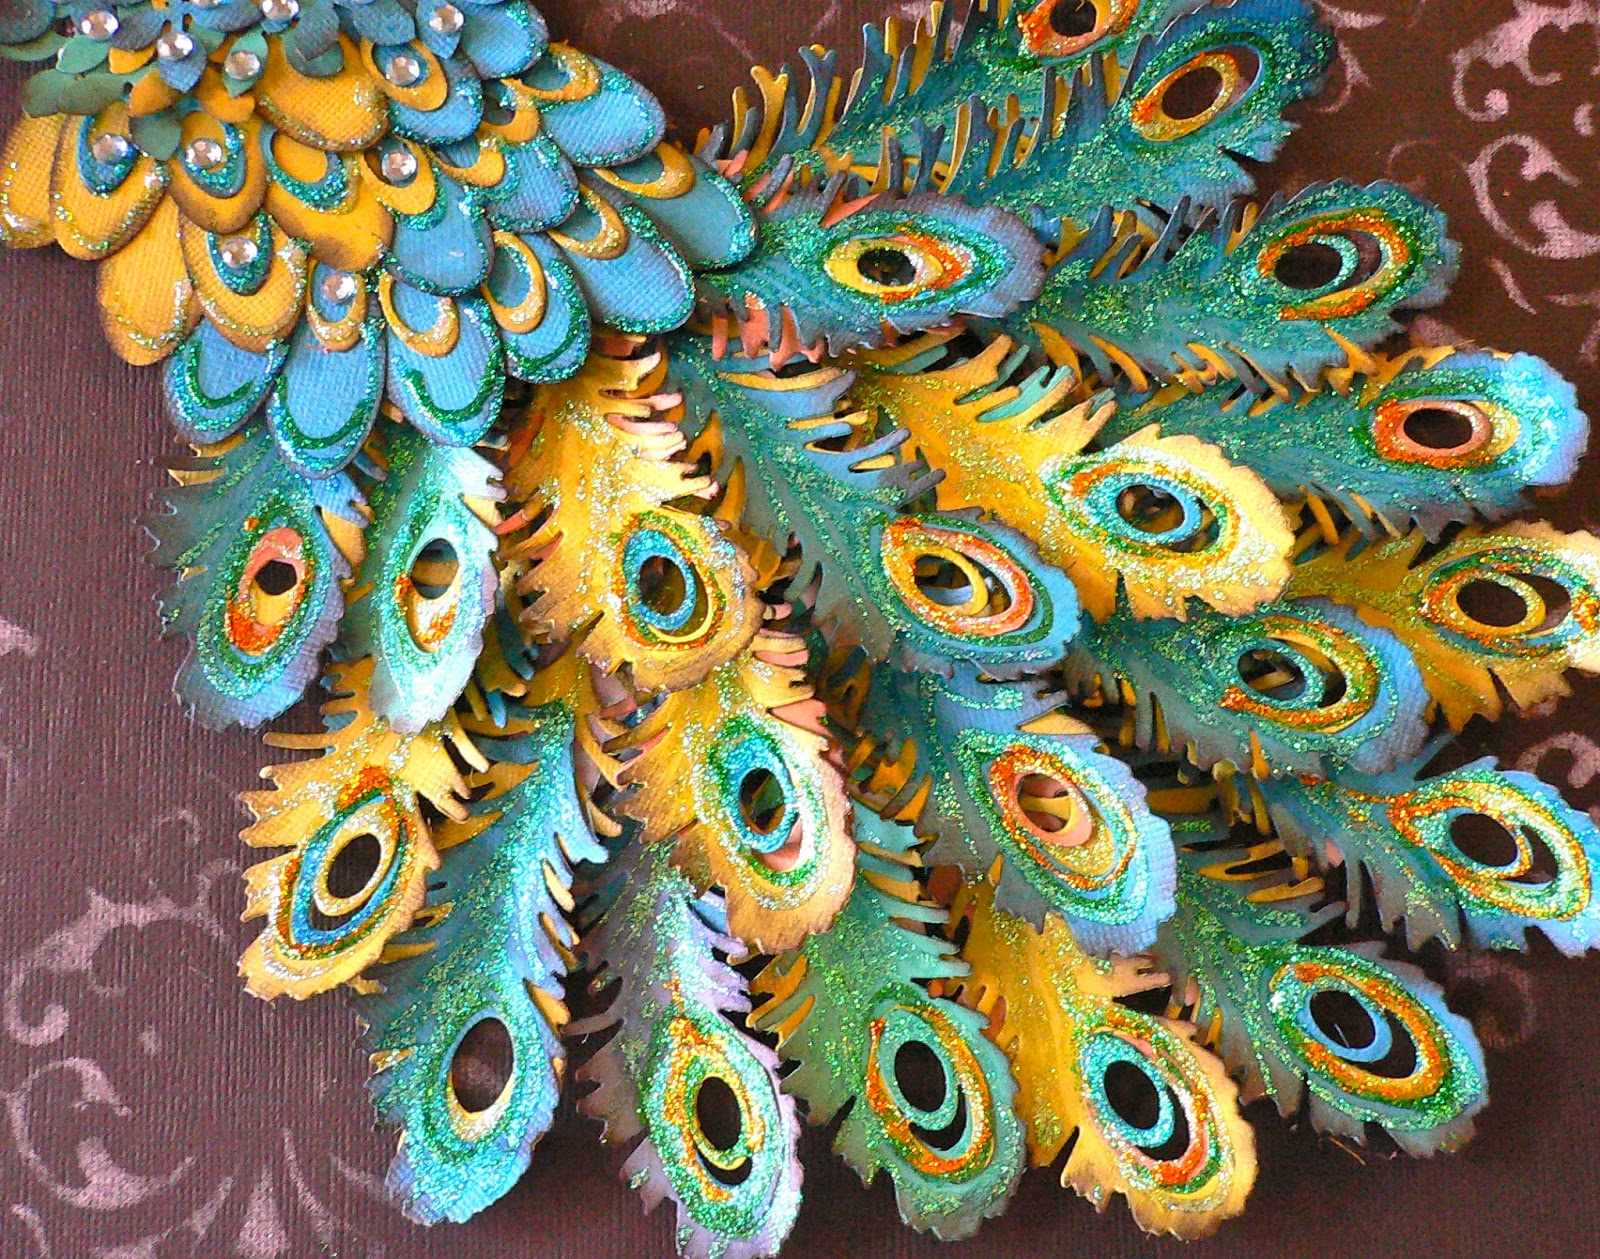


Highlight the edges of the feathers with Green, Gold and Crystalina Glitzin' Glamour Glitter Glue. Let dry.

Couture Creations Supplies - Peacock Pride
CO723707 Glamour Days Collection - Peacock Delight Decorative Die
CO721996 Crystal Self-Adhesive Gemstones
CO721991 Green Envy Self-Adhesive Gemstones
CO721978 Green Glitzin' Glamour Glitter Glue 
CO721971 Crystalina Glitzin' Glamour Glitter Glue
CO721976 Gold Glitzin' Glamour Glitter Glue
CO723780 Foam Mounting Tape
CO723623 Sponge Daubers

Other Supplies: Cardstock, Stencil; Leaf Punch; Oval Punch; Ink; White Pen


Peacock Mask


Peacock Mask Instructions

Use Mod Podge to adhere torn pieces of vintage music paper to a plastic mask. Let dry.

Adhere lace trim and Seaspray and Vintage Gold Self-Adhesive Gemstones to the top section of mask as shown below.


Create 10 doubled layered peacock feathers using the same technique shown in the step-by-step above for the Peacock Pride project.

Arrange a cluster of bird feathers and paper peacock feathers and adhere to each end of mask with Double Sided Tape and 3D Foam Dots.


Create bows with sheer ribbon and layered blue silk flowers with a pearl brad center. Adhere these clusters to each side of the mask.

Create a background with a stencil and a white inkpad, attach the mask to background.


Couture Creations Supplies - Peacock Mask
C0723707 Glamour Days Collection - Peacock Delight Decorative Die
C0721996 Crystal Self-Adhesive Gemstones
C0721990 Vintage Gold Self-Adhesive Gemstones
C0723780 3D Foam Dots
C0721963 Foam Mounting Tape
C0721983 Doubled Sided Tape
C0723623 Sponge Daubers

Thanks for looking!
Cheers, Adriana


Monday, February 3, 2014

New Baby Set by Sue Smyth


Hi! Couture Creations Designer Sue Smyth here today. Nothing says baby more than a cut rocking horse, so creating a card and pick is a snap with the NEW Secret Treasures Rocking Horse Die.
Insert the pick into flowers or use as a present topper.


Rocking Horse Instructions:

Paint a die-cut Rocking Horse with Hot Pink Glitzin' Glamour Glitter Glue.


Drench the horse with white glitter to fill the gaps and create a smooth surface.


Shake off the excess glitter and allow to dry.

Tattered Bow Instructions:


Tie a bow with organza or silk ribbon.


Hold the bow in place with a bamboo skewer and heat set.

Retro Flower Instructions:


Die-cut 6 flower shapes with the smallest Retro Flower Die from pink cardstock. Pierce a hole in the center of each flower with the Paper Piercer from the Handheld Essentials Set.


Insert a small brad and splay flowers around brad.


Wet each flower and scrunch with fingertips. Unfurl and heat set to hold in shape.

Embossed Card Base Instructions:
Emboss white cardstock with the Cheerful Embossing Folder and rub over with chalk pad.

Assemble card and pick as pictured.

Couture Creations Supplies:
CO723518 Secret Treasures Collection - Rocking Horse
CO723524 Secret Treasures Collection - Retro Flowers Die
CO723282 Elegance Collection - Cheerful Embossing Folder
CO721974 Hot Pink Glitzin' Glamour Glitter Glue
CO723041 Scallop Circle Nesting Dies
CO723040 Circle Nesting Dies
CO721986 Handheld Essentials Set - Paper Piercer

Monday, December 16, 2013

Peace on Earth Card with Dana


Hi! Dana here today sharing a vintage Christmas card that I created using the Couture Creations Christmas Morning Embossing Folder. The beautiful embossed edge made an elegant frame for my card. I layered pieces of vintage newspaper and sheet music and a vintage postcard onto my embossed card base. I loved the image on the postcard and decided to play up the green and purple color palette for a non-traditional holiday card.


I topped my festive embellishment cluster with a stamped sentiment that I cut from a vintage book page. I just love the look of aged paper! I added some sparkle to the butterfly wings with Green Glitzin' Glamour Glitter Glue.


I finished my card with some decorative chipboard and a vintage inspired key.

Thanks so much for stopping by today! I wish you and yours all the best this holiday season!

Couture Creations Supplies:
CO723590 Wrapped in Joy Collection - Christmas Morning Embossing Folder
CO721978 Green Glitzin' Glamour Glitter Glue
CO723039 Precision Trimmer

Monday, December 2, 2013

Christmas Ornament with Dana Tatar


Hi! Dana here today sharing a Christmas ornament that I created with pieces of embossed chipboard. This project started out as a mini album kit. Instead of using the triangular tree portions as pages, I glued them all together to create a fun and colorful ornament for the tree!


I embossed each section of the tree with the Wild Holly Embossing Folder. I painted the front and back of each piece with a light coat of gesso and then a colorful Gelato. I highlighted the embossing with Silver Inka-Gold. I dipped the edges of each colorful tree segment in white acrylic paint for a frosty feel. Once the paint was dry, I glued the sections together to form the tree. No Christmas tree is complete without bling, so I embellished the tree with Moonlight Self-Adhesive Pearls and Silver Glitzin' Glamour Glitter Glue.


I created a photo frame for the back of the ornament with the Scalloped Oval and Oval Nesting Dies.


I finished embellishing the back of the ornament with a stamped sentiment and Moonlight Self-Adhesive Pearls.

Thanks so much for stopping by today!

Couture Creations Supplies:
CO723593 Wrapped In Joy Collection - Wild Holly Embossing Folder
CO723045 Scalloped Oval Nesting Dies
CO723044 Oval Nesting Dies
CO721998 Moonlight Self-Adhesive Pearls
CO721970 Silver Glitzin' Glamour Glitter Glue

Other Supplies: Chipboard Mini Album: Maya Road; Cardstock: Core'dinations; Patterned Paper: Momenta; Letter Stickers: Prima; Stamp: Paper Wings Productions; Gesso: Faber-Castell Design Memory Craft; Ink: Ranger; Gelatos: Faber-Castell Design Memory Craft; Inka-Gold: Viva Decor; Paint: Plaid; Other: Bell, Seam Binding

Wednesday, October 23, 2013

Peace on Earth with Patti Hamil

Hi! Patti here today sharing a technique that is easy, but beautiful, especially for holiday cardmaking or scrapbooking. I started out with one of the gorgeous Wrapped In Joy embossing folders. I chose the Champagne and Holly Embossing Folder because I wanted to color the little holly leaves  different colors for a festive feel.


Here are a couple of close-ups of the finished project.


First, I gathered supplies, the embossing folder, my trusty tweezers, markers and some gems.

I colored in the embossed leaves and berries with several light colors of markers. I used pink, blue, green and burgundy.


After coloring the design the magic starts! I then rubbed iridescent ink over the entire embossed image. It lightens the colors and adds just the right amount of shimmer!

 I used Aztec Gold Glitzin' Glamour to highlight the little berries.
This is a large card design, so I added an embossed strip across the two sections where the two embossed papers joined.

I thought a little bird would look perfect on this card, so I cut a piece of cardstock with the Dove of Peace Die and colored it with the same blue marker and Shimmers ink I used to color the embossed cardstock.


This is how it looked.


I used the Picture Frame Nesting Dies to frame my sentiment. I embossed a small piece of gold paper with the Champagne and Berries Embossing Folder to use behind the little frame as a backing.


I added a few matching blooms and some gems to finish the card. The result is a very striking card made with simple techniques. I hope you enjoyed this technique too!
 
Thanks for stopping by today!
~Patti

Couture Creations Supplies:
CO723606 Wrapped In Joy Collection -  Champagne and Holly Embossing Folder
CO723407 Endless Dreams Collection -  Dove of Peace Die
CO723215 Picture Frame Nesting Dies
CO721989 Seaspray Self-Adhesive Gemstones
CO721981 Aztec Gold Glitzin' Glamour


Monday, October 21, 2013

Peace Card with Pam Bray


Hi! Pam here today. Can you believe that the holidays are just around the corner? It is never to late to start thinking of making Christmas Cards, decorations or gifts. The Couture Creations NEW Wrapped in Joy Embossing Folder Collection is perfect for holiday crafts. Today I would like to share with you my non-traditional  "Peace Card" using the Peace and Joy Embossing Folder.


I started my card by running a 5" x 7" piece of white cardstock, that I cut on my Couture Creations Precision Trimmer, through my embossing machine.


I repeated the process with purple and blue cardstock and with some pretty striped patterned paper.


I love to fussy cut, so using my Sharp Point Scissors, that is what I did with the "Peace" portion from the blue cardstock and the striped piece of patterned paper.

I rubbed Purple Glitzin' Glamour on the top of each of the embossed ornaments with my finger tip. Then, with a piece of scrap paper, I kissed each ornament to pick up the Glitzin' Glamour that may have gone off of the embossed image.

I then took the paper piercer from the Handheld Essentials Kit and, using the tip, placed a bit of the Aztec Gold Glitzin' Glamour over the top of each of the embossed ornament hangers.


I used my Sponge Dauber and a bit of Concord Grape Distress Ink to color the edges of my white card base prior to putting it together.


I layered all the pieces on top of my purple card base using Double-Sided Tape.


I added the "Peace" embossed image that I had previously fussy cut to the top of the striped strip with Foam Mounting Tape.


I placed a pretty bow on the top of each ornament.


I added Seaspray Self-adhesive Gemstones to the ends of the striped patterned paper.


Hugs, Pammejo

Couture Creations Supplies:
CO723594 Wrapped in Joy Collection - Peace and Joy Embossing Folder
CO721981 Aztec Gold Glitzin' Glamour
CO721972 Purple Glitzin' Glamour
CO721989 Seaspray Self-Adhesive Gemstones
CO721984 Double-Sided Tape
CO721963 Foam Mounting Tape
CO721957 Cutting Mat
CO721956 Sharp Point Scissors
CO723039 Precision Trimmer
CO721986 Handheld Essentials
CO723061 Sponge Daubers