Showing posts with label Secret Treasures Collection. Show all posts

Wednesday, March 12, 2014

Spread You Wings and Soar Card by Cathi O'Neill


Hi! Couture Creations Designer Cathi O'Neill here today sharing a card I created with the gorgeous Harmony Oriental Garden Embossing Folder and the Secret Treasures Feather Die!
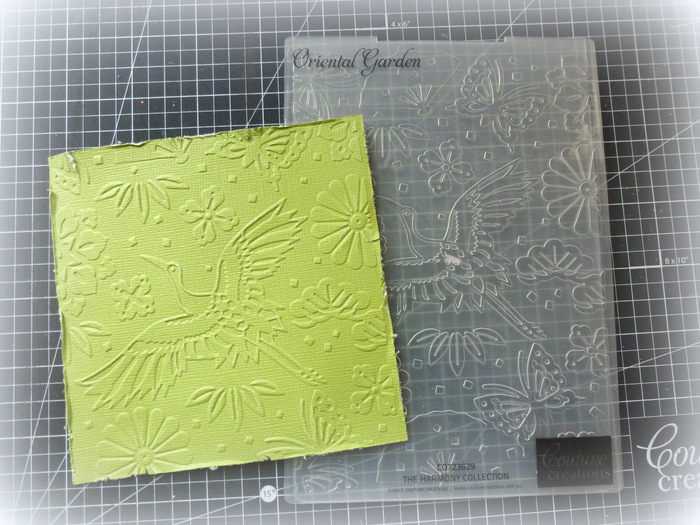

I embossed some Core'dinations Grassroot cardstock using the Harmony Oriental Garden Embossing Folder. I cut the paper down to 4 3/4" square and matted it with a second layer of Tim Holtz Worn Lipstick Core'dinations cardstock measuring 5" square.


I added a golden sheen to the embossed areas on the cardstock using gold gilding wax.


I added stitching to the card edges.

I die-cut more of the Worn Lipstick Core'dinations cardstock using the Secret Treasures Feather Die. I embossed the edges of the feathers with olive gold embossing powder, adding a bit more of the gold gilding wax. I finished the card with a bit of twine and a sentiment.


I hope you like my card! Thanks so much for stopping by!
~Cathi

Couture Creations Supplies:
CO723629 Harmony Collection - Oriental Garden Embossing Folder
CO723516 Secret Treasures Collection - Feather Die
CO721965  18mm Double Sided Tape
CO721961  12mm Foam Mounting Tape
CO721955  Premium Non-Stick Scissors

Monday, March 10, 2014

Feather Card by Sue Smyth


Hi! Couture Creations Designer Sue Smyth here today sharing a feather card. Those of you who know me, know how much I love birds and feathers. So, when Couture Creations came out with 
this Feather Die, I was in heaven! I have shared with you how to alter these feathers before in a previous post, so today I want to share another technique. I hope to come up with lots of ways to alter this feather. I have not even started with color yet!


I have made one feather as per my previous post and now here is another way, with very little in the way of materials.


Step 1: Cut feathers out of white cardstock and light weight chipboard. Adhere both together.


Step 2: Rub black ink all over the feather. Allow to dry.


Step 3: Draw in lines with a gel or paint pen. Add spots and detail as desired.

Happy creating!
~Sue

Couture Creations Supplies:
CO723516 Secret Treasures Collection - Feather Die

Friday, March 7, 2014

Welcome Baby Card by Patti Hamil


Hi! Patti here today sharing a card using the Journal Tab Die and Rocking Horse Die from the Secret Treasures Collection. I started out by selecting some Core'dinations cardstock in three colors and a scrap piece of coordinating patterned paper. I chose a 6x6 blue cardstock for the base of the card and trimmed a little off each side so that I could put it on a 6x6 white card base.


I die-cut three journal tabs in different colors. I then adhered the piece of patterned paper to the blue base, added the 3 journal tab die-cuts and some letter stickers in opposite colors to the top and bottom tabs. I then die-cut a rocking horse from white glitter paper, inked it with blue and placed it on the center journal tab.


I added a Self-Adhesive Seaspray Gemstone to the eye of the rocking horse. The holes along the side of the journal tabs were the perfect location for looping a tiny blue bow.

This card was super quick to create and this design can be easily adapted for girls or for boys! 
 
Thanks for stopping by today!
 
Couture Creations Supplies:
CO723518 Secret Treasures Collection - Rocking Horse Die
CO723526 Secret Treasures Collection - Journal Tab Die
CO721989 Seaspary Self-Adhesive Gemstones
CO721984 Double Sided Tape

Friday, February 28, 2014

Not Without my Mickey by Tracey Cooley


Hi Creators! Couture Creations Designer Tracey Cooley here today. I am loving the new Secret Treasures and Madeline collections of dies and the Harmony embossing folders that have been recently released! Here are a couple of ideas on how to use them. 

My youngest daughter has just started Primary school and I remembered that I had not created a layout for her first day of Kindy. I remember this day very well as I tried my hardest not to get upset when I dropped her off, but alas, I am a sook and blubbered all the way home. She was so little! Her favorite toy at the time was Mickey Mouse. She was so excited to go to Kindy, but NOT WITHOUT HER MICKEY!


Tip: A great way to add a mat to your lace die-cut is to trace around the edge of the die itself and then cut out the shape with Precision Scissors.


Cut a lace die in an alternate color. Note: I used the Les Fleurs Ornamental Lace Die.


The Circle Nesting Dies are just perfect for making a silhouette of Mickey Mouse! Simply cut one large circle and 2 small circles and voila! Add a bow to one ear to turn Mickey into Minnie.

Flowers: Cut 3 large Retro Flowers and 4 medium Retro Flowers. Ink the edges of the petals if desired. Spritz with water and press center into a mouse pad or molding pad. Note: I used a Sharpie for the large flower and a paintbrush handle for the small flower.


 Once dry, pinch each petal to give a 3D effect. Next adhere layers alternately to form entire blossom.


Leave the larger petals off to make smaller blossom. To make the flowers a little more special, spray with spray adhesive and sprinkle with glitter. If desired, add a Gemstone to finish off the flower center.

I seem to use a certain size of my Self-Adhesive Gemstones more than the others, so I have found a great way to use leftover gemstones to make flourishes. Simply draw a flourish, freehand or with a stencil, and add gems. Try mixing several colors of gemstones.

Keep on Creating!

Couture Creations Supplies:
CO723524 Secret Treasures Collection - Retro Flowers Die
CO723552 Secret Treasures Collection - Bird Song Die
CO723517 Secret Treasures Collection - Party Banner Die
CO723527 Secret Treasures Collection - Classic Chevron Die
CO723534 Secret Treasures Collection - Square Plaque Die
CO723243 Madeline Collection - Les Fleurs Die
CO723040 Circle Nesting Dies
CO723635 Harmony Collection - Journal Cards Embossing Folder
CO721994 Pink Diva Self-Adhesive Gemstones
CO721984 Double-Sided Tape - 12mm
CO721961 Foam Mounting Tape - 12mm


Friday, February 14, 2014

Heartfelt Banner by Sue Smyth


Hi! Couture Creations Designer Sue Smyth here with you today sharing a little piece of eye candy. I love making banners! This banner could be used for Valentine's Day or for an anniversary.


The large heart panels are die-cut from white cardstock with the Hearts Nesting Dies.


First, die-cut five large hearts from white cardstock using the largest Heart Nesting Die. Ink the edges with red ink. 


For the second layer of the banner, die-cut five hearts from red cardstock with the second largest Heart Nesting Die and then emboss those hearts with the Cheerful Embossing Folder. Rub over the embossed hearts with a pearl paint. Once dry, mount the painted hearts onto the white hearts with Foam Mounting Tape.


Use the Kaleidoscope Die to cut four hearts from pink glitter paper to create the third layer of the banner. Mount each Kaleidoscope heart onto white cardstock and attach to the red hearts with 


Embellish the middle heart with paper flowers. For a shabby finish, dab the flowers with gesso. Add a chip word.


Use the Aurora Vine Die to cut leaves from green cardstock to tuck around the flower cluster. Tip:
Trim the die-cut leaves to create small leaflets that are easier to work with. Add bits of gauze and a resin heart to the flower cluster.


Place eyelets into each side of the hearts. String the banner together with wide organza ribbon embellished with pearls.


Finish the banner by embellishing the Kaleidoscope hearts with Moonlight Self-Adhesive Pearls
and white fiber.

Happy crafting!
~Sue 

Couture Creations Supplies:

CO723530 Secret Treasures Collection - Aurora Vine
CO723409 Endless Dreams Collection - Kaleidoscope Heart
CO723213 Heart Nesting Dies
CO723282 Elegance Collection - Cheerful Embossing Folder
CO721998 Moonlight Self-Adhesive Pearls
CO721962 Foam Mounting Tape


Friday, February 7, 2014

Just Dreamin' Layout by Sue Smyth


Hi! Couture Creations Designer Sue Smyth here today. My Daughter just loves to day dream, and here she is on our friends boat. Who knows what she is thinking.


I just love the Secret Treasures Feather Die, and here I have combined it with real feathers to 
embellishment my layout. I have several ways I like to alter the feathers and today I will share one of them below.


Designer Tip: Use Couture Creations Gemstones to embellish lace borders.


Step 1. Cut several feathers from white cardstock and light-weight chipboard using the Feather Die. Adhere the white cardstock to the chipboard.


Step 2. Use a fine tip pen to doodle in lines over the feather.


Step 3. Spray the feather with water to blend the pen ink.


Step 4. Allow to feather to dry naturally to enable the pen ink to bleed. Blend the ink a little with your finger if needed. Hint: Use a white gel or paint pen to add spots or highlights.

Happy Crafting!

Couture Creations Supplies:
CO723516 Secret Treasures Collection - Feather Decorative Die
CO723531 Secret Treasures Collection - Ivy Decorative Die
CO721994  Pink Diva Gemstones
CO723545 Damask Delight Paper Pad 

Thursday, February 6, 2014

Live Your Life Out Loud Card by Adriana Bolzon


Hello there everyone! Couture Creations Designer Adriana Bolzon here today sharing a card I created with two of the latest dies from the Madeline and Secret Treasures Collections.


The gorgeous doily in the background is created with the Les Fleurs Doily Die. I inked the edges with brown ink and a Sponge Dauber.


The floral cluster was created with the Aurora Vine Die (leaves) and the Retro Flowers Die (pink blooms). I cut several flowers using the Retro Flowers Die, curled the edges of the petals over with a very thin stick, glued them together and placed a Cafe Creme Self-Adhesive Pearl in the center of each flower.

Thanks for stopping by today!

Couture Creations Supplies:
CO723243 Madeline Collection - Les Fleurs Doily Die
CO723530 Secret Treasures Collection - Aurora Vine
CO723524 Secret Treasures Collection - Retro Flowers
CO721999 Cafe Creme Self-Adhesive Pearls
CO721962 Foam Mounting Tape
CO723623 Sponge Dauber

Monday, February 3, 2014

New Baby Set by Sue Smyth


Hi! Couture Creations Designer Sue Smyth here today. Nothing says baby more than a cut rocking horse, so creating a card and pick is a snap with the NEW Secret Treasures Rocking Horse Die.
Insert the pick into flowers or use as a present topper.


Rocking Horse Instructions:

Paint a die-cut Rocking Horse with Hot Pink Glitzin' Glamour Glitter Glue.


Drench the horse with white glitter to fill the gaps and create a smooth surface.


Shake off the excess glitter and allow to dry.

Tattered Bow Instructions:


Tie a bow with organza or silk ribbon.


Hold the bow in place with a bamboo skewer and heat set.

Retro Flower Instructions:


Die-cut 6 flower shapes with the smallest Retro Flower Die from pink cardstock. Pierce a hole in the center of each flower with the Paper Piercer from the Handheld Essentials Set.


Insert a small brad and splay flowers around brad.


Wet each flower and scrunch with fingertips. Unfurl and heat set to hold in shape.

Embossed Card Base Instructions:
Emboss white cardstock with the Cheerful Embossing Folder and rub over with chalk pad.

Assemble card and pick as pictured.

Couture Creations Supplies:
CO723518 Secret Treasures Collection - Rocking Horse
CO723524 Secret Treasures Collection - Retro Flowers Die
CO723282 Elegance Collection - Cheerful Embossing Folder
CO721974 Hot Pink Glitzin' Glamour Glitter Glue
CO723041 Scallop Circle Nesting Dies
CO723040 Circle Nesting Dies
CO721986 Handheld Essentials Set - Paper Piercer