Showing posts with label Endless Dreams. Show all posts

Monday, March 17, 2014

Lucky to Have You Card by Vicki Robertson


HI! Vicki Robertson here today sharing a wee bit of St. Patrick's Day inspiration with you. With any luck at all, I'll be celebrating the day with the someone special in my life!

I have used a square base, which if you haven't read before, is my favorite! There is something about creating on a square space that makes me happy. It's like a mini scrapbook layout the takes on a life of it's own and doesn't have to go into an album!

I used cardstock matted with both a layer of patterned paper and more cardstock as the card base. Next, I die-cut the lace doily background for the bouquet from white cardstock using the Couture Creations Les Fleurs Die. It's inked in a rainbow pattern with distress inks. ( Note: I saved the negative piece cut from the center of the doily for use on the card later.) The bouquet base is next, and is cut from green glitter paper using the Couture Creations Roses Nesting Die.

The shamrocks and four leaf clovers are cut from cardstock, gold glitter and velvet specialty papers. I adhered them to the doily starting on the outer edge and working toward the center. The different colors and textures are placed alternately throughout and I added dimension to them as I built the bouquet higher. In the very center of the bouquet I added a smaller Couture Creations Roses Nesting Die die-cut and matted it with the negative piece of the doily that I saved. I tucked in gold vines around the outer edges of the doily and under the bow that were cut with the Couture Creations Jasmine Dream Die.

The computer generated sentiment is cut with a banner die and inked with gold along the edges. I tucked it under a stack of clovers and shamrocks on top of the roses die-cut. For a pop of color and to emphasize the sentiment, I made two shamrocks from red velvet. One is stacked under the gold shamrock and I cut the heart shape on top from the other. The final touch to the bouquet is a gold mesh bow that I made using my Craft-Dee BowZ Bow Making Tool.


I love the contrast between the gold, green and red that is so evident in this close up.

Thanks for stopping by to share my St. Patrick's Day inspiration!
~Vicki

Couture Creations Supplies:

CO723415 Endless Dreams Collection - Jasmine Dream Decorative Die
CO723243 Madeline Collection - Les Fleurs Lace Die
CO723218 Roses Nesting Dies
CO721962 Foam Mounting Tape
CO721956 Stainless Steel Scissors
CO721957 Self Healing Cutting Mat
CO723061 Sponge Dauber

Other Supplies: Cardstock: Bazzill; Glitter Paper: American Crafts, Recollections; Velvet Paper: SEI; Patterned Paper: CTMH; Lucky Leaves Die: Memory Box; Pennant Die: Spellbinders; Bow Making Tool: Craft-Dee BowZ; Other: Ribbon

Friday, February 14, 2014

Heartfelt Banner by Sue Smyth


Hi! Couture Creations Designer Sue Smyth here with you today sharing a little piece of eye candy. I love making banners! This banner could be used for Valentine's Day or for an anniversary.


The large heart panels are die-cut from white cardstock with the Hearts Nesting Dies.


First, die-cut five large hearts from white cardstock using the largest Heart Nesting Die. Ink the edges with red ink. 


For the second layer of the banner, die-cut five hearts from red cardstock with the second largest Heart Nesting Die and then emboss those hearts with the Cheerful Embossing Folder. Rub over the embossed hearts with a pearl paint. Once dry, mount the painted hearts onto the white hearts with Foam Mounting Tape.


Use the Kaleidoscope Die to cut four hearts from pink glitter paper to create the third layer of the banner. Mount each Kaleidoscope heart onto white cardstock and attach to the red hearts with 


Embellish the middle heart with paper flowers. For a shabby finish, dab the flowers with gesso. Add a chip word.


Use the Aurora Vine Die to cut leaves from green cardstock to tuck around the flower cluster. Tip:
Trim the die-cut leaves to create small leaflets that are easier to work with. Add bits of gauze and a resin heart to the flower cluster.


Place eyelets into each side of the hearts. String the banner together with wide organza ribbon embellished with pearls.


Finish the banner by embellishing the Kaleidoscope hearts with Moonlight Self-Adhesive Pearls
and white fiber.

Happy crafting!
~Sue 

Couture Creations Supplies:

CO723530 Secret Treasures Collection - Aurora Vine
CO723409 Endless Dreams Collection - Kaleidoscope Heart
CO723213 Heart Nesting Dies
CO723282 Elegance Collection - Cheerful Embossing Folder
CO721998 Moonlight Self-Adhesive Pearls
CO721962 Foam Mounting Tape


Friday, September 6, 2013

Passion Embossing Folder Week - Die-Cut Inlay Card with Gloria

Hello, it is Gloria with you! This week the CSW Team is sharing creations using the Couture Creations Passion Embossing Folder. Here is what I made for you.


I am always on the hunt for NEW embossing folder techniques, and I wanted to give the die-cut inlay technique a try.

To create the card follow these steps:
1. Make a 5x5 inch card from blue cardstock.

2. Trim green patterned paper slightly smaller than the card front and set aside.

3. Trim white cardstock to 5x7 inches (to fit the embossing folder.

4. Place small die cuts onto the front of the white cardstock and tape into place with repositionable tape. Die-cut the white cardstock and set aside. (You won't need the die-cut shapes. You want the cardstock piece with the "holes.")

5. Die-cut the same shapes from dark blue and maroon cardstock. (I chose the Couture Creations Decorative Dies from the Endless Dreams Collection: Baby Dove and Magical Butterfly.
 

6. Make sure that the die-cut shapes fit into your holes on the white cardstock and that you can trim the cardstock to the correct size. Remove the shapes and set them aside.


7. Emboss the white cardstock with the Passion Embossing Folder. (If you wish, you can also emboss the die-cut "inlays.")


8. Trim the white cardstock to slightly smaller than the green designer paper. Using maroon ink (Clearsnap Colorbox Archival Dark Cherry), buff the edges of the embossed paper.

9. Attach the white embossed cardstock to the green designer paper, then wrap a length of green seam binding around the panel and secure. Attach the panel to the card front.

10. Using a clear glue, place the colored die cut shapes into the holes in the embossed cardstock as shown. The die-cut shapes are "inlaid" with the embossed paper. Plus you can see the green designer paper peeking through!


11. Stamp a sentiment with the Dark Cherry ink and cut it out with Couture Creations Square Nesting dies. Mat with dark blue cardstock. Attach to the card with foam tape.


12. Finish the card with a green bow made from seam binding. Attach a blue button and some twine to the top of the bow. Line your card with white cardstock.

For a twist on this folder:


I have created another project with this folder, using an ink technique. To see the tutorial, click HERE.

To see what the team has made, check here:
Pam
Patti
Dana

Thanks for looking!
Gloria (Scraps of Life)

Couture Creations Supplies:
CO723251 Fine Designs Collection - Passion Embossing Folder
CO723042 Square Nesting Dies
CO723408 Endless Dreams Baby Dove
CO723412 Endless Dreams Magical Butterfly
CO721962 Foam Mounting Tape
CO721957 Cutting Mat
CO721986 Handheld Essentials
CO723039 Precision Trimmer, Pink
CO721956 Sharp Point Scissors
CO723061 Sponge Daubers

Other: Cardstock: WorldWin Papers Premium White, Cut Mates Blue Potatoes, Grape Jelly; Designer paper: Echo Park For the Record 2 Documented; Ink: Clearsnap Colorbox Archival Dark Cherry; Stamp: Papertrey Ink Stylish Sentiments Birthday; Ribbon: Really Reasonable Ribbon (moss seam binding); Twine: craft store; Button: unknown; Adhesive: Aleene's Tacky Glue

Saturday, August 31, 2013

Wild Holly Card with Tracey

Hi Creators! Tracey Cooley here with you today sharing a card I created with the Couture Creations Wild Holly Embossing Folder from the NEW Wrapped in Joy Collection. This embossing folder collection really captures the spirit of Christmas and each folder gives a clean, crisp, embossed impression. I especially like the Wild Holly Embossing Folder and I hope you like it too!


I started this card with a 5"x7" brown card base. I then cut and adhered a green mat measuring 4.75"x 6.75" and a white piece of cardstock, embossed with the Wild Holly Embossing Folder, measuring 4.5"x6.5" on top of the card base.


Using a Couture Creations Sponge Dauber, ink the embossed cardstock with red ink leaving the center of the card its original color. Then work in some chocolate brown ink and finally some olive green ink. Adhere to your card base. Tip: Keep working the inks until you achieve a nice blended look that fades from red to olive.


Bring some nature into this card by finding an interesting looking stick from your garden and painting it with brown acrylic paint. Let dry.


Wrap the branch with white netting and secure it to the branch with some hot glue. Apply spray adhesive to the netting and sprinkle with white glitter. Attach the branch embellishment to the card base with hot glue.


Cut some holly and a small wren from the Couture Creations Vintage Christmas Paper Pad and attach to your branch. Pop a flourish behind your bird using the Couture Creations Endless Dreams Decorative Die Moments In TimeTip: Cut the Moments In Time die-cut flourish in half and place both pieces exactly where you like them. Voila!

Thanks for stopping by today! Keep On Creating!

Couture Creations Supplies:
CO723434 Endless Dreams Collection - Moments In Time Die
CO723593 Wrapped In Joy Collection - Wild Holly Embossing Folder
CO723551 Vintage Christmas Paper Pad
CO723061 Sponge Dauber

Monday, July 8, 2013

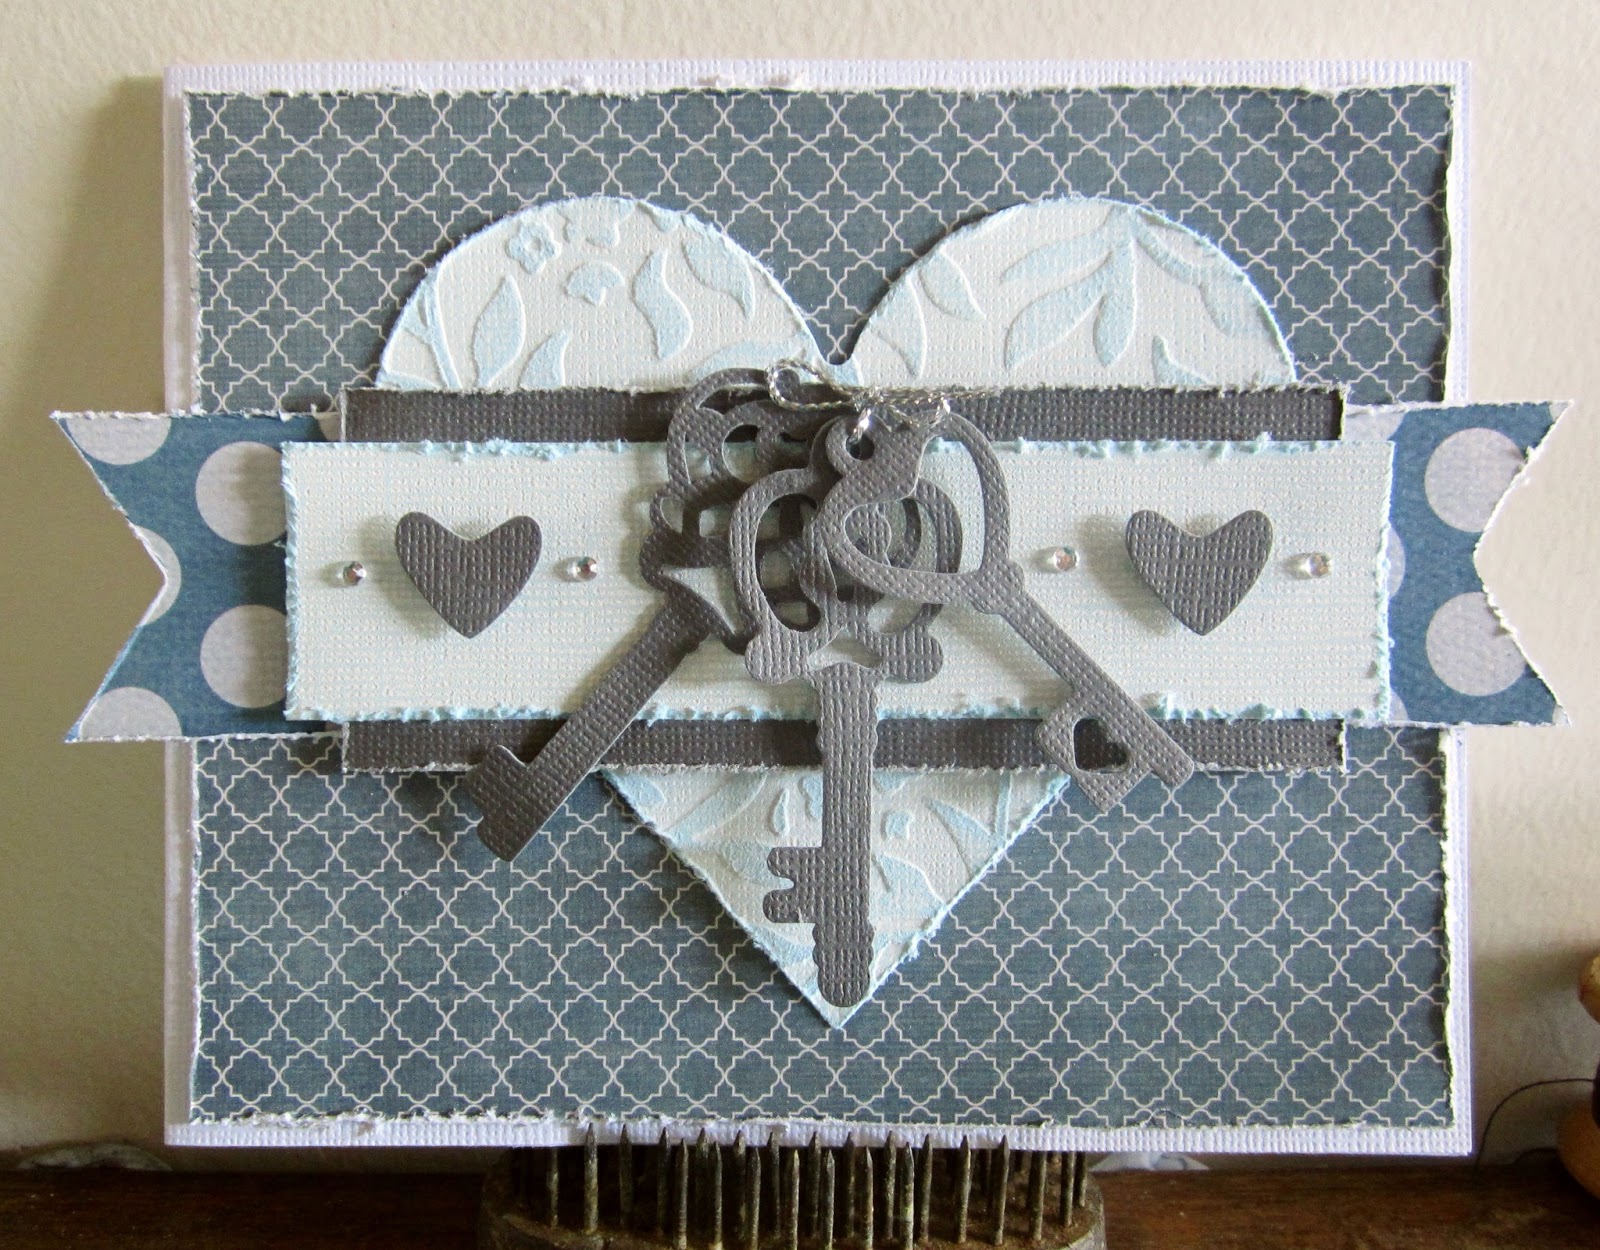
Couture Creations Endless Dreams - Decorative Key Card

Hi, Kerrie Gurney here today for CSW Distributors!


I'm using the fun decorative key dies from the Couture Creations Endless Dreams Collection for the focal point of my card. You can use keys on so many projects!  I thought I would do a quick card that can be used for any occasion. Cut the card base to 12" x 5" and fold in half. Cut a piece of patterned paper to 5 3/8" x 4 3/8" and adhere to the card base.


Die-cut a heart using a piece of Core'dinations Cellar Door Whitewash Cardstock and a Couture Creations Heart Nesting Die. Emboss the heart using the Couture Creations Extra Loren Embossing Folder. Gently sand the heart to reveal the blue core color.


Die-cut one of each of the decorative keys in grey cardstock using the Couture Creations Aladdin, Baroque and Key To My Heart Dies. Cut several strips of paper; a piece of patterned paper to measure  7" x 1.5," a piece of grey cardstock to measure 4.5" x 1 3/8" and a piece of Whitewash cardstock to measure 5 1/4" x 1."


Distress all the edges of the paper strips using scissors or a distressing tool.


Die-cut another key from the Key To My Heart die. You will use the heart shape from the center of both dies. Layer all the pieces onto the card base. Use Foam Mounting Tape on the grey strip of cardstock to add some dimension to the card. Tie the keys together using silver cord.


Use Foam Mounting Tape behind the heart accents. Finish the card by adding some Couture Creations Crystal Gemstones.


Couture Creations Supplies:
CO723417 - Endless Dreams Decorative Die, Aladdin Key
CO723419 - Endless Dreams Decorative Die, Baroque Key
CO723418 - Endless Dreams Decorative Die, Key to My Heart
CO723445 - Elegance Embossing Folder, Extra Loren
CO721996 - Gemstones, Crystal
CO721955 - Pointed Non-Stick Scissors
CO723060 - Sanding Block
CO721961 - Double Sided Foam Mounting Tape 12mm
CO721985 - Double Sided Tape 6mm
CO721954 - Precision LED Tweezer

I hope you have enjoyed this tutorial!  Happy Creating!

Wednesday, July 3, 2013

United We Stand Card by Cathi O'Neill


Hi! Cathi O'Neill here today with a patriotic card for CSW Distributors. I just love to use vintage images with my cards, and I paired one with my Couture Creations embossing folders, dies and pearls to make a red, white and blue Fourth of July card!


I started by using the Couture Creations Fresh and Fun Large Powder Puff Embossing Folder. The shapes reminded me of stylized fireworks and was the perfect backdrop for my image.


I used Scallop Square Nesting Dies, and put two together to make my rectangular shape, hiding the joint under the festive ribbon. 


I cut a slit into the cardstock with my Couture Creations Craft Knife and threaded the ribbon through so it could lay flat.


To make my rolled flowers I used the smallest flower form the Couture Creations Daisy Nesting Die set and cut a spiral into each of them, rolling and securing the flower and adding a pearl in the center of the flowers. 


I used the Endless Dreams Tranquility Decorative Die, which again reminded me of fireworks, to embellish the card.


To put the card together I used 18mm Double Sided Tape to attach the scallop squares to the embossed card base.


I attached the vintage image and sentiment with Couture Creations Foam Mounting Tape to add dimension. I love this foam tape so much, I don't have much left! I think I need to put in a request for more soon! I just love the dimension it gives to cards and layouts!


I tied the bow around the card, added the sentiment and glued the flowers and flourishes into place.


Couture Creations Supplies: 

CO723217  Daisy Nesting Dies 
CO723043  Scallop Square Nesting Dies  
CO723435  Endless Dreams Decorative Die - Tranquility  
CO723441  Fresh and Fun - Super Powder Puff Embossing Folder  
CO721955  Premium Non-Stick Scissors  
CO721986  Handheld Essentials - Craft Knife  
CO721961  12mm Foam Mounting Tape  
CO721965  18mm Double Sided Tape  
CO721997  Self Adhesive Pearls

Thanks for stopping by today and Happy Fourth of July!

Cathi