Showing posts with label Kerrie Gurney. Show all posts

Monday, December 23, 2013

Christmas Centerpiece and Bon Bons by Kerrie Gurney

Hi everyone! Kerrie Gurney here today sharing some Christmas decor pieces. This Christmas I am repeating my theme of Red, Cream/White and Kraft that I used last year and loved so much. I have used the Couture Creations Magical Christmas Eve Decorative Die for both of these very easy projects.

Bon Bons
When I saw these Bon Bons in the store I knew they would be perfect for our Christmas theme but they were a bit boring and needed a something added to them to give them more of a Christmas feel. I wanted something that didn't take a lot of effort as these would be tossed in the bin after they had been pulled open on Christmas Day. My solution was to add some die-cut poinsettia flowers to these store bought bons bons taking them from drab...


 to fab...


With not much effort, you could add more embellishments if you like, but as they will just be thrown out, I thought this was enough.


To create the poinsettia flowers, use red cardstock, run the dies through a die cutting machine and while the cardstock is still in the die, run it through the machine again using the Couture Creations Latex Embossing Mat to give the flower petals embossed detail.


Pinch the petals to give them more character.


As these bon bons will be thrown out once pulled apart, I only used one each of the large and small petal die-cuts, die-cutting the middle piece from gold cardstock and adding some Red Glitzin' Glamour Glitter Glue to add some sparkle.

Table Centerpiece

Start with a store bought pine table centerpiece.


Hot glue some glitter baubles and poinsettias created from old book paper. Create the poinsettia flowers the same way as the red poinsettias, but to save time, die-cut 4 pieces of book paper at a time. (Book paper is quite thin so you can cut 4 sheets at a time.) To create a fuller poinsettia flower, use two large and one small die-cut petals for each flower, die-cut the center from gold glitter cardstock.


To embellish the candle, add some pleated hessian, tie some jute string around the middle of the hessian and add a poinsettia flower created using old book paper and gold glitter cardstock for the center and the leaves. TIP: Use a battery operated candle so there is no chance of your embellishment catching fire.

Thanks for visiting and I hope I have inspired you to create some decor for your Christmas table!

Couture Creations Supplies:
CO723562 Magical Christmas Eve Decorative Die
CO721979 Red Glitzin' Glamour Glitter Glue
CO723514 Latex Embossing Mat

Wednesday, December 18, 2013

Scalloped Paper Christmas Tree by Kerrie Gurney

Hi! Kerrie here today. With Christmas fast approaching I am in full decorating mode. I just love creating special little décor items for our home and also to give to friends. I made lots of these paper trees last year and this year a friend asked me to create one for her so I thought I would add a twist to my plain trees by using Couture Creations Scallop Square Nesting Dies to give this tree a cute edge.


Die-cut 12 of each of the 5 smaller sizes of the Scallop Square Nesting Dies from old book paper. I die-cut 6 sheets at a time, the paper is thin enough to cut through 6 sheets at a time.


Cut a piece of cardboard slightly smaller than the largest die-cut square and glue one sheet of die-cut book paper, this will be the base of the tree.


You will need a skewer and a peat pot or some type of pot for your base. Push the cardboard base onto the skewer and then hot glue the base to the pot.


Now, starting with the biggest size square, start layering the book paper squares onto the skewer. When layering the squares, leave a gap and rotate the squares to give the tree character.


Finish the tree by adding a poinsettia as a tree topper. Die-cut 2 small petals and one large petal using the Magical Christmas Decorative Die. Hold the petals together with a small brad.


Smoosh a bit of Red Glitzin' Glamour Glitter Glue onto the petals and pinch them to add life to the poinsettia.


TIP: Add Crystalina Glitzin' Glamour Glitter Glue to the edge of each layer to add some sparkle, or spray the whole tree with adhesive spray and sprinkle with glitter.

Happy Christmas Creating!
~Kerrie 

Couture Creations Supplies:
CO723043 Scallop Square Nesting Dies
CO723562 Magical Christmas Eve Decorative Die
CO721979 Red Glitzin' Glamour Glitter Glue

Wednesday, December 4, 2013

O' Christmas Tree Card by Kerrie Gurney

Hi! Kerrie Gurney here today with a super quick, but different, card that is easy to mass produce for Christmas.

I have used the A2 Early One Morning Embossing Folder from the Wrapped In Joy Collection, Core'dinations ColorCore Cardstock, Couture Creations Self-Adhesive Pearls and some seam binding ribbon.


Cut a piece of Core'dinations cardstock to 8.5" x 4.5" and fold into a gate fold.


Emboss a piece of Core'dinations cardstock with the Early One Morning Embossing Folder.


Cut straight down the middle of the embossed image and sand with the Couture Creations Sanding Block to revel core color.


Sand the edges of the card base with the Couture Creations Sanding Block.


Place Double-Sided Tape across the middle of the card base.


Attach ribbon to both sides of the gate fold with enough length to tie the ribbon into a bow.


Add the embossed sections to the front of the gates, add some Moonlight Self-Adhesive Pearls and tie a bow to close. Tip: Add a pocket to the inside of the card and place a gift card inside.

Couture Creations Supplies:
CO723600 Wrapped in Joy Collection - Early One Morning Embossing Folder
CO721988 Moonlight Self-Adhesive Pearls
CO723060 Sanding Block
CO721955 Sharp Point Scissors
CO721984 Double-Sided Tape


Tuesday, October 1, 2013

Wrapped In Joy Week - Cadbury's First Christmas by Kerrie Gurney


Hi, Kerrie Gurney here with a Christmas layout using the new Couture Creations Jolly Christmas Paper Pad, Wrapped In Joy Embossing Folders and Sophia Dies. I love the fun designs and colors of the Jolly Christmas Paper Pad. I very rarely decorate for Christmas in traditional colors, so it is perfect for me!

To create this layout cut 4 x 1" strips from teal colored cardstock and emboss using the Jolly Christmas Embossing Folder. Note: Two pieces of cardstock can fit through the slot in the top of the  embossing folder, cutting your embossing time in half!


Mitre cut the corners of the cardstock by holding two strips together as they would be arranged on the layout and simply cut with a pair of Sharp Point Scissors.


Emboss a piece of darker teal cardstock using the Peaceful Ornaments Embossing Folder and sand all embossed pieces with the Couture Creations Sanding Block to reveal color core of the cardstock. 


Die-cut one of each of the Matiloa and Bossa Sophia Dies using teal cardstock and Jack patterned paper.


Arrange all the page elements onto the patterned paper used for the base of the layout. Use Foam Mounting Tape to attach the embossed border to the page. Sprinkle tinsel glitter onto the die-cuts. Accent several circles on the patterned paper with Seaspray Gemstones.


Happy Creating! 

Couture Creations Supplies:
CO723549 12x12 Jolly Christmas Paper Pad
CO723595 Wrapped In Joy Collection - Jolly Christmas Embossing Folder
CO723604 Wrapped In Joy Collection - Peaceful Ornaments Embossing Folder
CO713493 Sophia Decorative Die - Matiloa
CO723501 Sophia Decorative Die - Bossa
CO721989 Seaspray Gemstones
CO723060 Sanding Block
CO721965 Sharp Point Scissors
CO721963 Foam Mounting Tape

Wednesday, August 14, 2013

Two Pocket Card by Kerrie Gurney

Hi! Kerrie here with a clever two pocket card tutorial for you today. I love creating this card for special occasions. You can get everyone to sign the tags or you can replace one of the tags with a gift card. It is super easy to create this card with just a single sheet of  8.5" x 11 3/4" (A4 for us Aussies) cardstock.


Fold the cardstock in half long side.


Undo and fold in half short side.

Unfold and cut the from the side into the middle fold line.


Fold the bottom right corner up to the center fold line.

Fold the top left corner down approx 1" to 1.5" from center fold line.


Fold the left top side over to the right.


Fold the whole bottom half up.


Fold the left side to the back. This gives you your pockets...easy! :)


Place the card, excluding the back flap, into the Extra Loren Embossing Folder.


Emboss.


Sand the front of the card using the Sanding Block to bring out the core color of the cardstock.


Place Double-Sided Tape as shown, peel off the protective backing and press to adhere.


Die-cut 1 Fantasia Dazzling Doily Die. Trim 1/3 off and use the bigger half on the front of the card.


Cut 1 tag to fit a 5 1/4" x 2 1/2" pocket and 1 tag to fit a 5 3/4" x 3" pocket. Cut pennants from patterned paper and die-cut a label using the Victorian Rectangle Nesting Die. Embellish the card with flowers, chipboard butterflies and Self Adhesive Pearls.


I hope you have enjoyed this tutorial! Happy creating!

Couture Creations Supplies:
CO723445 Elegance Extra Loren Embossing Folder
CO723225 Fantasia Dazzling Doily Die
CO723049 Victorian Rectangle Nesting Dies
CO721996 Self Adhesive Pearls - Crystal
CO721971 Glitzin' Glamour Glitter Glue - Crystalina
CO721965 Double-Sided Tape
CO721963 Foam Mounting Tape
CO721965 Sharp Point Scissors

Monday, July 8, 2013

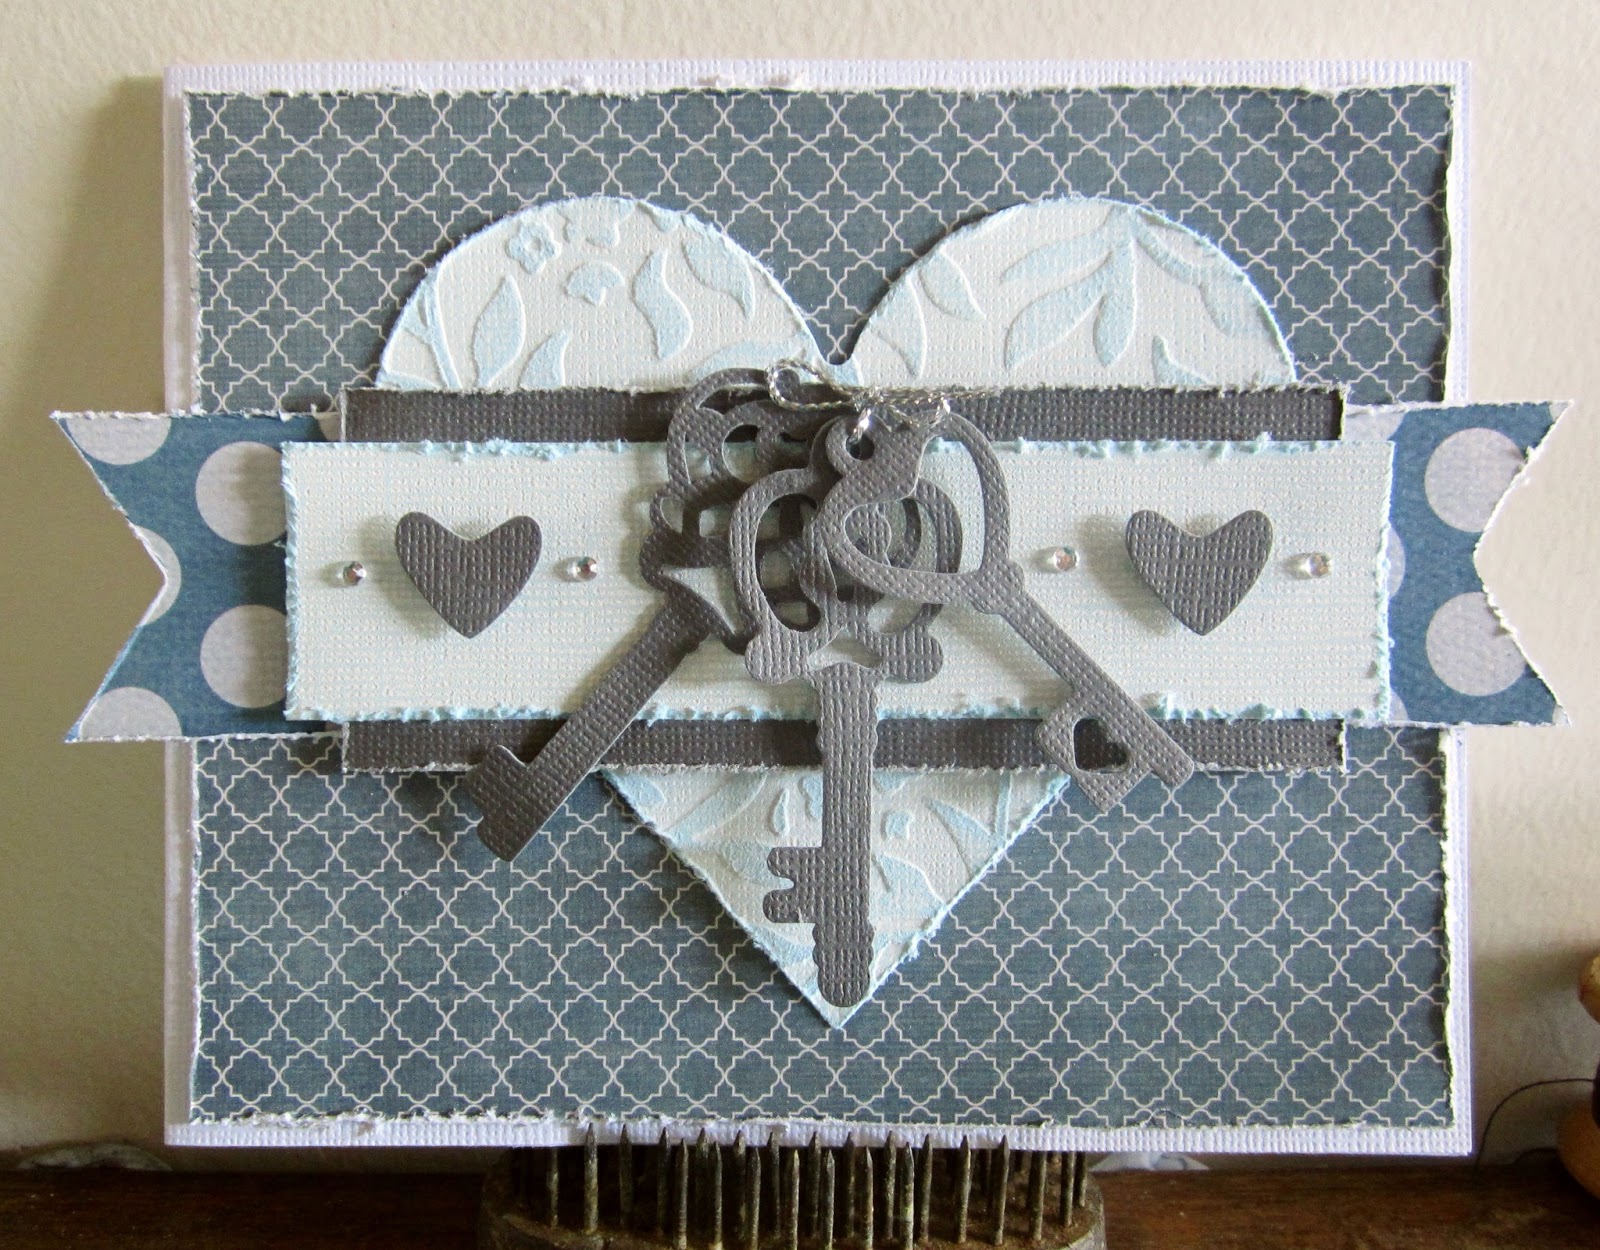
Couture Creations Endless Dreams - Decorative Key Card

Hi, Kerrie Gurney here today for CSW Distributors!


I'm using the fun decorative key dies from the Couture Creations Endless Dreams Collection for the focal point of my card. You can use keys on so many projects!  I thought I would do a quick card that can be used for any occasion. Cut the card base to 12" x 5" and fold in half. Cut a piece of patterned paper to 5 3/8" x 4 3/8" and adhere to the card base.


Die-cut a heart using a piece of Core'dinations Cellar Door Whitewash Cardstock and a Couture Creations Heart Nesting Die. Emboss the heart using the Couture Creations Extra Loren Embossing Folder. Gently sand the heart to reveal the blue core color.


Die-cut one of each of the decorative keys in grey cardstock using the Couture Creations Aladdin, Baroque and Key To My Heart Dies. Cut several strips of paper; a piece of patterned paper to measure  7" x 1.5," a piece of grey cardstock to measure 4.5" x 1 3/8" and a piece of Whitewash cardstock to measure 5 1/4" x 1."


Distress all the edges of the paper strips using scissors or a distressing tool.


Die-cut another key from the Key To My Heart die. You will use the heart shape from the center of both dies. Layer all the pieces onto the card base. Use Foam Mounting Tape on the grey strip of cardstock to add some dimension to the card. Tie the keys together using silver cord.


Use Foam Mounting Tape behind the heart accents. Finish the card by adding some Couture Creations Crystal Gemstones.


Couture Creations Supplies:
CO723417 - Endless Dreams Decorative Die, Aladdin Key
CO723419 - Endless Dreams Decorative Die, Baroque Key
CO723418 - Endless Dreams Decorative Die, Key to My Heart
CO723445 - Elegance Embossing Folder, Extra Loren
CO721996 - Gemstones, Crystal
CO721955 - Pointed Non-Stick Scissors
CO723060 - Sanding Block
CO721961 - Double Sided Foam Mounting Tape 12mm
CO721985 - Double Sided Tape 6mm
CO721954 - Precision LED Tweezer

I hope you have enjoyed this tutorial!  Happy Creating!