Showing posts with label Sanding Block. Show all posts

Friday, January 31, 2014

Friends by Pam Bray


Hi! Pam here today sharing with you a fun stitching technique using your Handheld Essentials Tool Kit and some embroidery thread. Using the paper piercer from the tool kit, pierce through the paper and flags that were cut from patterned paper using Precision Scissors and use a straight stitch to sew through the pierced holes.


Here is a closer look. Remember to keep your thread straight as you stitch.


I embossed a strip of green Core'dinations cardstock using the Crazy Daisy Embossing Folder, sanded it with the Sanding Block, and added it to my layout with Double Sided Tape. I ran pink Core'dinations cardstock through my die-cutting machine using the Scallop Nesting Circles and then the Crazy Daisy Embossing Folder. I sanding the embossed circle with the Sanding Block and added some rhinestones to the flower centers to complete the layout. I hope you try adding stitiching to your paper!

Hugs, Pammejo

Couture Creations Supplies:
CO723041 Scallop Circle Nesting Dies
CO723255 Fine Designs Collection - Crazy Daisy Embossing Folder
CO721985 Double Sided Tape
CO721955 Precision Scissor
CO721957 Self Healing Mat
CO723039 Precision Trimmer
CO723060 Sanding Block
CO721986 Handheld Essentials

Thursday, January 9, 2014

All Occasions Feature Week - Spring Roses Card by Tracey Cooley

Hi Creators! Tracey Cooley here today. My daughter set me a challenge recently to make a spring card so I immediately thought of the Couture Creations Joe's Garden Embossing Folder from the All Occasions Collection.


I simply embossed a piece of Core'dinations White Wash Cardstock with the Joe's Garden Embossing Folder and sanded the roses with the Couture Creations Sanding Block.


Then I colored the leaves with some acrylic paint and a fine paintbrush. I did this very roughly to create a shabby effect. I simply embellished the card with some flowers to finish.

Keep on Creating!


Couture Creations Supplies:
CO723298 All Ocassions Collection -  Joe's Garden Embossing Folder
CO723060 Sanding Block
CO721984 Double-Sided Tape

Friday, January 3, 2014

Creating A Bow with Pam Bray


Hi! Pam here today. Have you ever wished you had a bow to place on your package? Well, fear not, because today I am going to share with you how easy it is to create a bow using your favorite Couture Creations Embossing Folder, some nice cardstock and a brad.


To begin, cut the following cardstock strips using your Couture Creation Precision Trimmer. I used a Color Core cardstock to make my bow.


Once you have cut all your strips, punch a hole in both ends of each strip using a hole punch or your Handheld Essentials Paper Piercer.


Run the cardstock strips through an embossing machine using the Moonlit Berries Embossing Folder.


 Lightly sand each cardstock strip with the Couture Creations Sanding Block.


Tip: Group the cardstock strips by size to keep them organized for placement onto the brad.


Start with the smallest cardstock strip, wrap it so the holes match up, and place the brad through the holes making sure the top of the brad is on the inside of the loop. Tip: Stick a pencil through the loop once the brad is in place to keep it secure while placing the rest of the strips onto the back of the brad.


Wrap each strip around your thumb...


...and place the looped strips onto the end of the brad. Once you have all the strips on the brad, fold down the ends of the brad to secure the strips in place.


Carefully twist the loops on the brad to arrange them, and just like that you have a beautiful bow! Have fun making them!

Hugs, Pammejo

Couture Creations Products: 
CO721957 Self Healing Cutting Mat
CO723039 Precision Trimmer
CO723060 Sanding Block
CO721986 Handheld Essentials - Piercing Tool
CO723596 Wrapped in Joy Collection - Moonlit Berries Embossing Folder 

Wednesday, December 4, 2013

O' Christmas Tree Card by Kerrie Gurney

Hi! Kerrie Gurney here today with a super quick, but different, card that is easy to mass produce for Christmas.

I have used the A2 Early One Morning Embossing Folder from the Wrapped In Joy Collection, Core'dinations ColorCore Cardstock, Couture Creations Self-Adhesive Pearls and some seam binding ribbon.


Cut a piece of Core'dinations cardstock to 8.5" x 4.5" and fold into a gate fold.


Emboss a piece of Core'dinations cardstock with the Early One Morning Embossing Folder.


Cut straight down the middle of the embossed image and sand with the Couture Creations Sanding Block to revel core color.


Sand the edges of the card base with the Couture Creations Sanding Block.


Place Double-Sided Tape across the middle of the card base.


Attach ribbon to both sides of the gate fold with enough length to tie the ribbon into a bow.


Add the embossed sections to the front of the gates, add some Moonlight Self-Adhesive Pearls and tie a bow to close. Tip: Add a pocket to the inside of the card and place a gift card inside.

Couture Creations Supplies:
CO723600 Wrapped in Joy Collection - Early One Morning Embossing Folder
CO721988 Moonlight Self-Adhesive Pearls
CO723060 Sanding Block
CO721955 Sharp Point Scissors
CO721984 Double-Sided Tape


Monday, October 28, 2013

Kromekote Christmas Card with Gloria

Hi! Gloria here with you today. WorldWin Papers has come out with a new line of cardstock called Kromekote. This cardstock collection contains foil, glossy, and glossy textured cardstock papers. The cardstock is a heavy weight, perfect for embossing and die-cutting. I know it may be early for Christmas, but I need to get a head start on my cards. Plus, look at this shimmery foil cardstock! It is perfect for the holidays!


I used the Kromekote Silver Foil cardstock for my card. I embossed the silver foil with the Couture Creations Cardinal's Wreath Embossing Folder, and then I gently rubbed the surface with a Sanding Block.


I used Copic markers to highlight just a few elements of the embossed image. I die-cut a small scrap of the silver foil cardstock with a mini tag die template, and then I stamped the sentiment on it with Staz-On Ink, which dries quickly on the glossy surface.


You can see here the "scratching" of the surface that happened when I gently buffed the raised images with a Sanding Block! It gives the card even more dimension.

Thanks for looking!

Couture Creations Supplies:
CO723599 Wrapped In Joy Collection - Cardinal's Wreath Embossing Folder
CO723060 Sanding Block

Other Supplies: WorldWin Papers: Kromekote Silver Foil, ColorMates Deep Emerald Isle, Deep Berry Red, Heritage White (inside); Die Template: Sweet and Sassy Stamps Mini Tags; Stamps: JustRite Deck the Halls; Ink: Tsukineko Staz-On Jet Black; Ribbon: Really Reasonable Ribbon; Markers: Copic R29, G16; Adhesive: Scor-tape, Scrapbook Adhesives by 3L 3D Foam Squares

Friday, October 11, 2013

Blessings with Pam Bray


Hi its Pam here today. I'm sharing my "Blessings" card that I created using the Confetti Embossing Folder from the Couture Creations Elegance Collection. I just love the Core'dinations Kraft Core Distress Cardstock and think the burnt orange is just perfect for the fall card I made.


The Kraft core really pops when I used my Sanding Block to sand the top of the embossed pattern and I love how the sunflowers look against it. I fussy cut my sunflowers out with my Sharp Point Scissors, after I colored them with Copic Markers, and placed them onto the front of my card with a bit of Foam Mounting Tape. I hope you have a blessed day!

Hugs,
Pammejo

Couture Creations Supplies:
CO723287 Elegance Collection - Confetti Embossing Folder
CO721963 Foam Mounting Tape
CO721965 Double-Sided Tape
CO721956 Sharp Point Scissors
CO721957 Cutting Mat
CO723039 Precision Trimmer

Friday, October 4, 2013

Wrapped In Joy Week - Quick and Easy Trendy Christmas Cards by Gloria Stengel

Hello everyone! Gloria here today sharing a few "trendy" Christmas cards with you for the Wrapped In Joy feature this week. I am on a kick to create cards that are: quick to create, use only basic supplies, and are easy to mail. (Both cards for today are standard size - 5 1/2 x 4 1/4 or A2.) I am not sure I would call myself a "trendy girl" but I thought that these two cards had that "vibe."


For this card, I made a black card base. I then embossed a piece of dark red Core'dinations cardstock with the Jolly Christmas Embossing Folder. I used the Sanding Block to sand the raised areas. The pale paper core shows through. I chose a trendy hexagon print paper to add some extra interest to the card, and I created an icicle border with a punch.


I added a very trendy chalkboard sentiment to the front of the card and finished it all off with a little "bell and bow" action. Clean and simple cards are all the rage these days. I confess that this is a style that I am not very good at, but I think this next card is my own version of CAS.


I embossed some textured glossy paper with the Peaceful Ornaments Embossing Folder. I trimmed off the bottom portion of the embossed image and added Self-Adhesive Gemstones to each of the embossed ornaments.


I added a sentiment, which is one of my very own stamp designs I cut out the sentiment with the Victorian Rectangle Nesting Dies. I rubbed the edges of the rectangle with green ink. I hope you are inspired to create some quick and easy and trendy Christmas cards!

Thanks for joining me today!

Couture Creations Supplies:
CO723595 Wrapped in Joy Collection - Jolly Christmas Embossing Folder
CO723604 Wrapped in Joy Collection - Peaceful Ornaments Embossing Folder
CO723049 Nesting Dies - Victorian Rectangle
CO721993 Red Lust Self-Adhesive Gemstones
CO721956 Sharp Point Scissors
CO721986 Handheld Essentials Tools
CO723061 Sponge Daubers
CO721985 Double-Sided Tape
CO721963 Foam Mounting Tape
CO721957 Cutting Mat
CO723039 Precision Trimmer
CO723060 Sanding Block

Thursday, October 3, 2013

Wrapped in Joy Week - Joy, Peace and Love with Pam


Hi! Pam here today wishing you each joy, peace and love. We are featuring the Couture Creations Wrapped in Joy Collection this week. For my project I made a "Joy, Peace and Love" Card using the Moonlit Berries Embossing Folder along with a piece of Core'dinations Burgundy Kraft Distress Cardstock that I ran through my embossing machine. I sanded the top lightly with my Couture Creations Sanding Block to expose the Kraft core of the pretty holly leaves before placing it on my 4" x 5 1/2" card base.


I added a bit of lace under my patterned paper that I attached to my card front with some Couture Creations Double-Sided Tape. I also adhered several small pieces of coordinating papers to the top of my card with Double-Sided Tape. I added a pair of epoxy Santa embellishments to finish my card. I hope you checkout all of the projects that will be shared in the coming days using the Wrapped in Joy Collection from Couture Creations here on the CSW Distributors Blog!

Hugs, Pammejo

Couture Creations Supplies:
CO723596 Wrapped in Joy Collection - Moonlit Berries Embossing Folder
CO721985 Double-Sided Tape - 1/4"
CO721963 Foam Mounting Tape
CO721965 Sharp Point Scissors
CO721957 Cutting Mat
CO721986 Handheld Essentials
CO723060 Sanding Block

Other Products:
Core'dinations Kraft Burgundy Distress Cardstock
My Minds Eye Paper Pad
Epiphany Round Bubble Caps
Kraft Cardstock
Tiny Attacher
White Eyelet Lace
Brown Ink

Friday, September 20, 2013

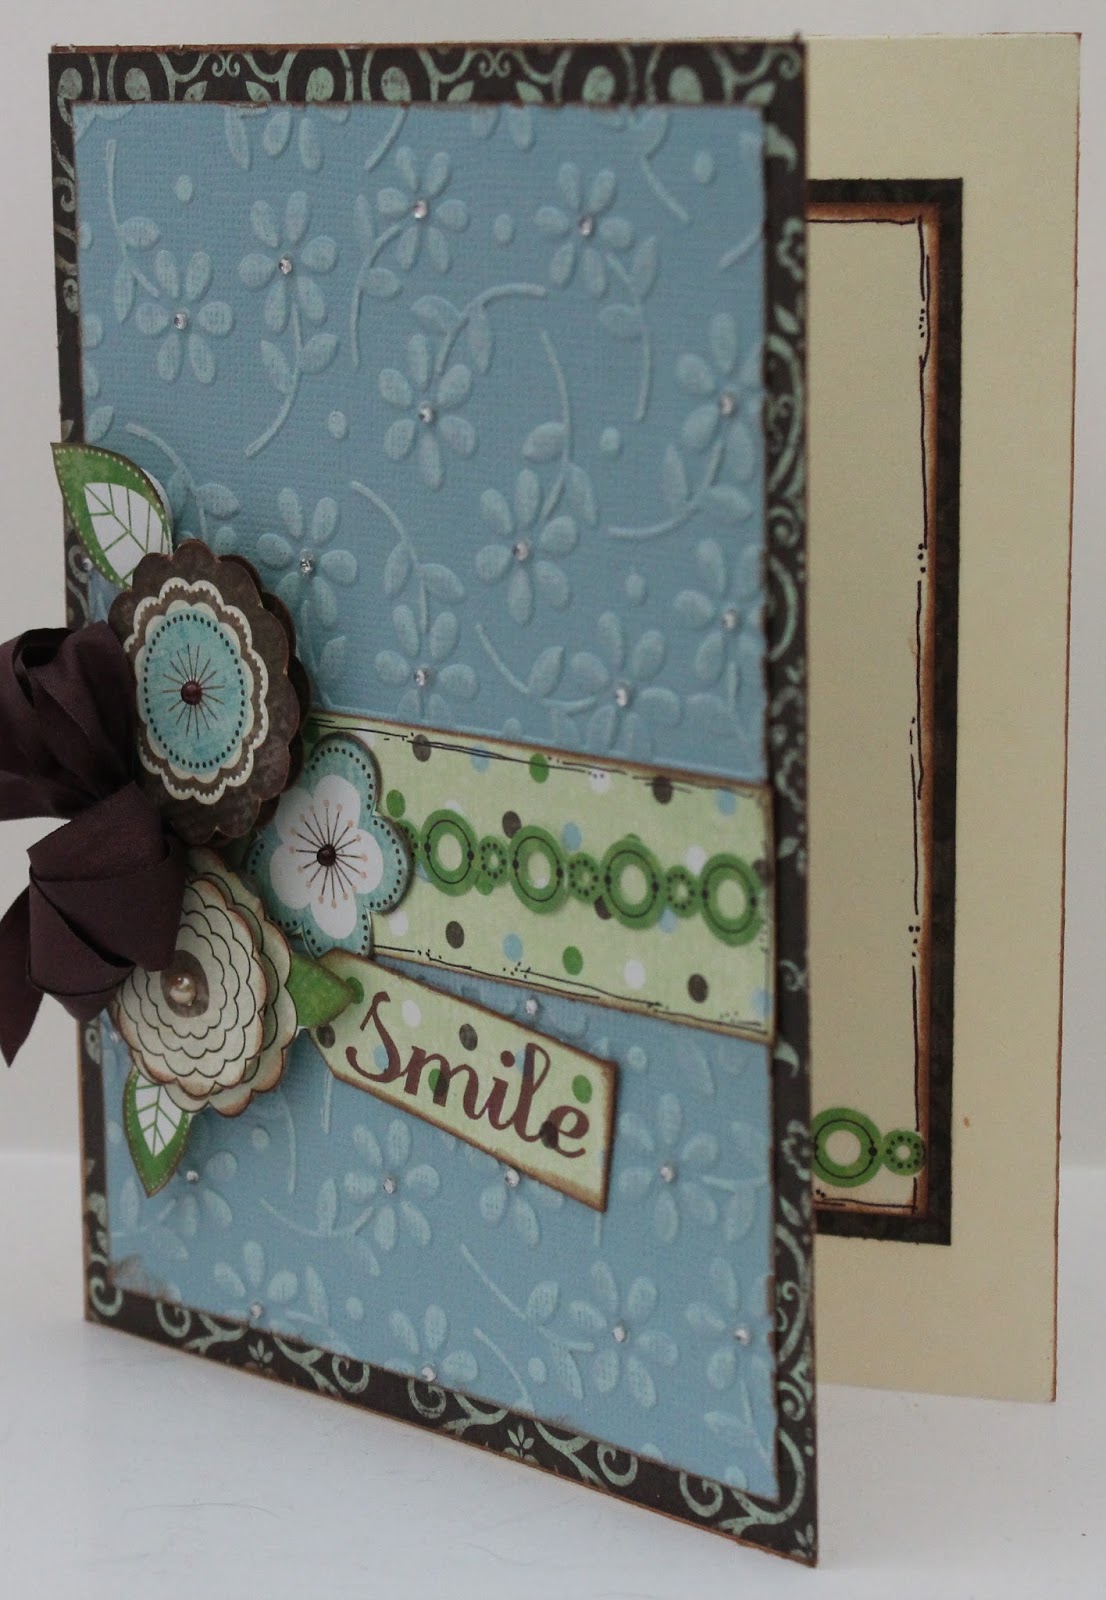
Smile with Pam Bray


Hello! Pam here today sharing with you my "Smile Card" using the Couture Creations Petal Pleasures Embossing Folder from the Fresh & Fun Collection. To begin with I went to the archives of my mass paper stash and found some Bo Bunny papers that I had forgotten about....I am sure if you are a paper crafter/scrapbooker you understand what I mean by the "archives" of paper stashes....anyway...I began by placing my patterned paper on top of a 4" x 5 1/2" piece of kraft paper.


I ran my Couture Creations Petal Pleasures Embossing Folder through my die-cutting machine using Core'dinations Color Core Cardstock. Once I had accomplished this, I sanded it lightly with my Couture Creations Sanding Block, and adhered it to the top of my paper with my 1/4" Double-Sided Tape. I placed small Clear Gemstones from Couture Creations in the centers of each of my flowers.


Add a fun strip of coordinating patterned paper and a sticker border to the center of the Petal Pleasures cardstock prior to placing your fussy cut flowers on to your card front with Couture Creations Foam Mounting Tape.

I hope you enjoyed my card today and that it made you smile.
Hugs, Pammejo

Couture Creations Supplies:
CO723273 Fresh & Fun Collection - Petal Pleasures Embossing Folder
CO721996 Clear Gemstones
CO721985 Double-Sided Tape - 1/4"
CO72`963 Foam Mounting Tape
CO721965 Sharp Point Scissors
CO721957 Cutting Mat
CO721986 Handheld Essentials
CO723060 Sanding Block

Other Supplies:
Bo Bunny Pattern Paper/Stickers
Blue Core'dinations Cardstock
Brown Satin Ribbon

Thursday, September 5, 2013

Passion Embossing Folder Week - Passion Card with Dana


Hi! Dana here today sharing a card for the Passion Embossing Folder feature this week. I wanted to create a passionate card so I started with a deep red cardstock from the Core'dinations Whitewash Collection that I embossed with the Passion Embossing Folder. I then sanded the embossed cardstock with my Couture Creations Sanding Block to reveal the red color core for a dramatic effect.


I applied a rub-on and a key to a rectangular piece of the same cardstock and sanded the edges with my  Sanding Block, a fun alternative to inking. I embellished the corners with Vintage Gold Self Adhesive Gemstones and attached the piece to my card with Foam Mounting Tape.

Thanks for stopping by today! Stop by tomorrow to see Gloria's beautiful card!
~Dana

Couture Creations Supplies:
CO723251 Fine Designs Collection - Passion Embossing Folder
CO721990 Vintage Gold Self Adhesive Gemstones
CO721963 Foam Mounting Tape
CO723060 Sanding Block

Friday, August 9, 2013

Hepburn Embossing Folder Week - Joie de Vivre with Pam


Hi! Pam here today sharing my first post as part of the CSW Distributors Design Team today. I want to share with you the beautiful Hepburn Embossing Folder from the Couture Creations Elegance Collection along with the Scallop Circle Nesting Dies that I used to create my Joie de Vivre Card.


I used a green shade of Core'dinations cardstock with the Hepburn Embossing Folder. I love the inner core of the cardstock. The embossed pattern always looks awesome and really stands out once sanded a bit with my Couture Creations Sanding Block.
 

Here is the side view of my card. You can see how the multiple layers add dimension and interest to my card. Thanks for stopping by today!

Hugs, Pammejo

Couture Creations Supplies:
CO723289 Elegance Collection- Hepburn Embossing Folder
CO723041 Nesting Dies - Scallop Circle
CO721963 Foam Mounting Tape
CO723060 Sanding Block

Monday, July 29, 2013

Friends Mini Album with Pam Bray


Hi! Pam Bray here today sharing one of my favorite projects, a mini album! They are one of my most favorite things to create and are a great way to make a few pictures last a lifetime. Today I'm sharing my Friends Mini Album. I created this album with a chipboard book that I had in my stash and the Couture Creations Large Vintage Girl Embossing Folder and Sunflower Nesting Dies. The Large Vintage Girl Embossing folder was the perfect size to embellish the front of the chipboard album!


I started by running the Large Vintage Girl Embossing Folder with salmon colored cardstock through my die-cut machine.


I then cut a bunch of sunflowers with the Sunflower Nesting Dies so I would be able to make my flowers.


When I was finished covering my album front and pages, I cut the excess paper off with my Craft Knife from the Handheld Essentials Kit and distressed the edges with the Sanding Block.

I also sanded the front of the embossed image with the Sanding Block to expose the white color core.

Taking my Couture Creations Precision Scissors, I cut around the frame.


I also cut out the inside of the embossed image so I could form a frame for the front of my album.


I inked all of the album pages and the frame with Distress Ink using a Couture Creations Sponge Dauber.

I added Couture Creations Double-Sided Tape to the cut out center so I could place a piece of pattern paper behind the frame.


I just love the Couture Creations Foam Mounting Tape, it gives great dimension and that is what I wanted to add to the front of my album.

To create the sunflowers from the Couture Creations Sunflowers Nesting Dies, ink them first, mist with water, wad them up and allow them to dry completely.

Once the flowers are completely dry, carefully open them up, layer them, and using your Couture Creations Handheld Essentials Paper Piercer, pierce a hole in the center and add a brad to hold the flowers together.


Here is a closer look at the flowers and the Large Vintage Girl frame I created.


Thanks for stopping by today!
Pammejo

Couture Creations Supplies:
CO723447 Large Vintage Girl Embossing Folder
CO723212 Sunflower Nesting Dies
CO721985 Double-Sided Tape
CO721963 Foam Mounting Tape
CO721956 Precision Scissors
CO721957 Cutting Mat
CO723060 Sanding Block
CO721986 Handheld Essentials
CO723061 Sponge Daubers