Showing posts with label Pam Bray. Show all posts

Friday, March 21, 2014

French Country Card by Pam Bray

 
Hi! Pam Bray here today sharing my French Country Card. I love the country vintage feel of the papers and they work perfectly with the Fubu Embossing Folder.

 
I started by first running Red Kraft Distress Core'dinations Cardstock through my embossing folder and then sanding it lightly with a Sanding Block. 

I die-cut one Ivy Doily using the Ivy Die Set from a piece of the green patterned paper.


I placed part of the Ivy Doily on top of a piece of the black patterned paper that I adhered to the top of the red Fubu embossed cardstock using Double-Sided Tape.


I also added a few of the patterned die-cut pieces to the front of my card using Foam Mounting Tape. I hope you try adding die-cut layers to your projects.

Hugs, Pammejo


Couture Creations Supplies:
CO723306 Fubu Embossing Folder
CO723222 Ivy Set Doily Dies
CO721985 Double Sided Tape
CO721961 Foam Mounting Tape
CO721955 Precision Scissors
CO721957 Cutting Mat
CO723039 Precision Trimmer
CO723060 Sanding Block
CO721986 Handheld Essentials
CO723039 Precision Trimmer

Wednesday, March 19, 2014

Exotic Card with Pam Bray


Hi! Pam Bray here today sharing a card that I created with the Exotic Embossing Folder (Fine Designs Collection) and the Connexion Intricutz Die (Sophia Collection) to make the perfect exotic card.


I started by embossing white cardstock with the Exotic Embossing Folder. Using Wild Honey Distress Ink and a Sponge Dauber I lightly brushed over the raised design to help match the color of the sunflowers on my patterned paper.


Here is closer look at the dimension of my exotic card. I love all the layers and the way the embossing folder comes to life when paired with patterned papers and leaves cut with the Connexion Die. I hope you try using some different inks with your embossing folders to see the amazing looks you will achieve!

Hugs, Pammejo

Couture Creations Supplies:
CO723506 Sophia Intricutz Collection - Connexion Die
CO723256 Fine Designs Collection - Exotic Embossing Folder
CO721961 Foam Mounting Tape
CO721985 Double Sided Tape
CO721955 Precision Scissors
CO721957 Self Healing Cutting Mat
CO721986 Handheld Essentials
CO723060 Sanding Block
CO723039 Precision Trimmer

Monday, March 3, 2014

Together is My Favorite Place to Be by Pam Bray


Hi! Pam here today sharing a card I created for part of my January Project Life. I love how the Connexion Intricutz Die from the Sophia Collection wraps the Large Vintage Girl Embossing Folder perfectly.


I started my 6" x 8" card by first embossing a piece of Sage Green Kraft Distress Core'dinations Cardstock with the Large Vintage Girl Embossing Folder.


I sanded it lightly with a Sanding Block.


I embossed a piece of white cardstock with the Large Vintage Girl Embossing Folder and fussy cut out the center oval shape with my Precision Scissors. I used Wild Honey Distress Ink and a Sponge Dauber to color the edge of the white oval.


I ran the Connexion Die through my die cut machine three times so I would have plenty of leaves to wrap around the oval once I placed it on the front of my card.


 Here is a closer look at the Large Vintage Girl embossed design and the Connexion die-cuts.


I had to let you see all of my fun little flowers that I made using the Roses Nesting Dies. I have placed Vintage Gold Gemstones in the centers of each flower.


I hope you enjoyed my 6" x 8" project life piece and that you will try to add some embossed pieces  and die-cuts to your Project Life Albums.

Hugs, Pammejo

Couture Creations Supplies:
CO723506 Sophia Collection - Connexion Decorative Die
CO723447 Elegance Collection - Large Vintage Girl Embossing Folder
CO723218 Roses Nesting Dies
CO721990 Vintage Gold Self-Adhesive Gemstones
CO721961 Foam Mounting Tape
CO721985 Double Sided Tape
CO721955 Precision Scissor
CO721957 Self Healing Cutting Mat
CO721986 Handheld Essentials
CO723060 Sanding Block
CO723039 Precision Trimmer

Wednesday, February 12, 2014

Be Mine Card with Pam Bray


Hi! Pam here today sharing a card I created for Valentine's Day. This card is really easy to make in a short amount of time with the help of Couture Creations embossing folders and dies!


Emboss a piece of Burgundy Kraft Distress Core'dinations cardstock with the Great Almanzo Embossing Folder. Lightly sand the embossed design with a Sanding Block and adhere to a cream colored card base. Add a chevron patterned paper to the bottom half of the card along with a border.


Cut two large Ivy Doilies from the Ivy Die Set. Cut one doily in half and place over the border. Add the second doily to the top of the card with Foam Mounting Tape. Add a beautiful bow, a couple of hearts, baubles, a sentiment and you have just created a lovely card! Simply change the sentiment on this card to adapt this design to fit any occasion.

I hope you have enjoyed my card and will try using your embossing folders and dies in new and fun ways.

Hugs, Pammejo


Couture Creations Supplies:
CO723444 Great Almanzo Embossing Folder
CO723222 Ivy Set Doily Dies
CO721985 Double Sided Tape
CO721961 Foam Mounting Tape
CO721955 Precision Scissors
CO721957 Cutting Mat
CO723039 Precision Trimmer
CO723060 Sanding Block
CO721986 Handheld Essentials

Monday, February 10, 2014

Valentine Candy Pillow Box with Pam Bray


Hi! Pam here today sharing how to create this sweet Candy Pillow Box. Start by making the box. I actually have a Pillow Punch Board from WRMK so it makes it easier to make, but I know there are other avenues for a similar pattern.


Cut two pillow boxes from two different pieces of patterned papers from the Pillow Box Punch Board. Fold one of the pillow boxes into shape, add Double Sided Tape to edge, and seal closed.


Fold one end of the pillow box closed. Place 3 mini candy bars inside the pillow box through the open end and fold closed.


Trim off the curved ends of the second pillow box to form a belly band. Place a small Scallop Circle Nesting Die in the center of the belly band and run it through a die-cutting machine. Note: This cut will create a small window in the band, allowing the patterned paper of the pillow box to show.


Place the belly band inside the Confetti Embossing Folder and run through a die-cutting machine.


Lightly sand the embossed belly band with a Sanding Block. Wrap the belly band around the pillow box and decorate.


I hope you enjoy making candy containers for Valentine's Day and hope it will be a sweet day for all!

Hugs, Pammejo

Couture Creations Supplies:
CO723287 Elegance Collection - Confetti Embossing Folder
CO723041 Scallop Circle Nesting Dies
CO721999 Cafe Creme Self-Adhesive Pearls
CO721985 Double Sided Tape
CO721955 Precision Scissors
CO721957 Self Healing Mat
CO723039 Precision Trimmer
CO723060 Sanding Block
CO721986 Handheld Essentials

Friday, January 31, 2014

Friends by Pam Bray


Hi! Pam here today sharing with you a fun stitching technique using your Handheld Essentials Tool Kit and some embroidery thread. Using the paper piercer from the tool kit, pierce through the paper and flags that were cut from patterned paper using Precision Scissors and use a straight stitch to sew through the pierced holes.


Here is a closer look. Remember to keep your thread straight as you stitch.


I embossed a strip of green Core'dinations cardstock using the Crazy Daisy Embossing Folder, sanded it with the Sanding Block, and added it to my layout with Double Sided Tape. I ran pink Core'dinations cardstock through my die-cutting machine using the Scallop Nesting Circles and then the Crazy Daisy Embossing Folder. I sanding the embossed circle with the Sanding Block and added some rhinestones to the flower centers to complete the layout. I hope you try adding stitiching to your paper!

Hugs, Pammejo

Couture Creations Supplies:
CO723041 Scallop Circle Nesting Dies
CO723255 Fine Designs Collection - Crazy Daisy Embossing Folder
CO721985 Double Sided Tape
CO721955 Precision Scissor
CO721957 Self Healing Mat
CO723039 Precision Trimmer
CO723060 Sanding Block
CO721986 Handheld Essentials

Wednesday, January 29, 2014

Thank You Card Set with Pam Bray


Hi! Pam here today sharing with you a fun, sweet Thank You card that is super easy to create. I embossed a piece of grey cardstock with the Cheerful Embossing Folder (Elegance Collection) and adhered it to a card base with Double-Sided Tape. I added a piece of square pink cardstock that I embossed with the Crazy Daisy Embossing Folder (Fine Designs Collection). I love the look of using two different embossing folders together.


Next, I added a patterned doily, that I cut with the Ivy Set Doily Die (Fantasia Collection), and a small patterned rectangle that I cut with a Scallop Rectangle Nesting Die, to the front of the card. I love how the patterned die-cuts add a pop of color. To finish the card, I fussy cut a few flags from pattern paper using the Precision Scissors, stamped on a sentiment, and added them to the front of the card with some fun embellishments.


Why make one card when you can make a set?! You never have to many Thank You cards.

Thanks for stopping by today!
Hugs, Pammejo

Couture Creations Supplies:
CO723222 Fantasia Collection - Ivy Set Doily Dies
CO723255 Fine Designs Collection - Crazy Daisy Embossing Folder
CO723282 Elegance Collection - Cheerful Embossing Folder
CO723047 Scallop Rectangle Nesting Dies
CO721995 Pink Flamingo Self-Adhesive Gemstones

CO721985 Double-Sided Tape

CO721955 Sharp Point Scissors

CO721957 Self Healing Mat
CO723039 Precision Trimmer
CO721986 Handheld Essentials

Friday, January 10, 2014

All Occassions Feature Week - You Sparkle You Shine Card with Pam Bray


Hi! Pam here with my first post for the New Year and what better way to celebrate than to share a card I created using the All Occasions Super Plush Embossing Folder!? I used a piece of Light Blue/Kraft Core'dination Distress Cardstock with the embossing folder and then lightly distressed it with my Couture Creations Sanding Block. I adhered the embossed piece to the front of a kraft card base and added some pretty pattern paper and a punched border that I embellished with Seaspray Self Adhesive Gemstones. I die-cut a Scallop Circle and a Circle from the Couture Creations Nesting Die Sets to place behind my die-cut sentiment.


Here is a closer look at the beautiful Super Plush Embossing Folder. Don't you love it? I know I do! I hope you have a wonderful, sparkly and sunshiny New Year!

Hugs, Pammejo

Couture Creations Supplies:
CO723454 All Occasions Collection -  Super Plush Embossing Folder
CO 723041 Scallop Circle Nesting Dies
CO723040 Circle Nesting Dies
CO721989 Seaspray Self-Adhesive Gemstones
CO721984 Double-Sided Tape
CO721955 Sharp Point Scissors
CO721957 Cutting Mat
CO723039 Precision Trimmer
CO723060 Sanding Block
CO721986 Handheld Essentials

Friday, January 3, 2014

Creating A Bow with Pam Bray


Hi! Pam here today. Have you ever wished you had a bow to place on your package? Well, fear not, because today I am going to share with you how easy it is to create a bow using your favorite Couture Creations Embossing Folder, some nice cardstock and a brad.


To begin, cut the following cardstock strips using your Couture Creation Precision Trimmer. I used a Color Core cardstock to make my bow.


Once you have cut all your strips, punch a hole in both ends of each strip using a hole punch or your Handheld Essentials Paper Piercer.


Run the cardstock strips through an embossing machine using the Moonlit Berries Embossing Folder.


 Lightly sand each cardstock strip with the Couture Creations Sanding Block.


Tip: Group the cardstock strips by size to keep them organized for placement onto the brad.


Start with the smallest cardstock strip, wrap it so the holes match up, and place the brad through the holes making sure the top of the brad is on the inside of the loop. Tip: Stick a pencil through the loop once the brad is in place to keep it secure while placing the rest of the strips onto the back of the brad.


Wrap each strip around your thumb...


...and place the looped strips onto the end of the brad. Once you have all the strips on the brad, fold down the ends of the brad to secure the strips in place.


Carefully twist the loops on the brad to arrange them, and just like that you have a beautiful bow! Have fun making them!

Hugs, Pammejo

Couture Creations Products: 
CO721957 Self Healing Cutting Mat
CO723039 Precision Trimmer
CO723060 Sanding Block
CO721986 Handheld Essentials - Piercing Tool
CO723596 Wrapped in Joy Collection - Moonlit Berries Embossing Folder 

Monday, December 9, 2013

Embossed Christmas Tag with Pam Bray


Hi! Pam here today sharing a fun tag. This tag is such an easy one to make, and if you are like me, you will need a lot of tags for the holiday season so why not make them gorgeous?! To begin, gather a scrap of white cardstock, cut into a tag and run it through the Christmas Lyrics Embossing Folder.


Transform this plain white tag into a gorgeous colorful tag using Distress Inks and a Sponge Dauber.


Add a  piece of pretty patterned paper to the top and bottom of the tag, a cute sticker die-cut attached to the tag with some Foam Mounting Tape and some Crystal Self-Adhesive Gemstones.


Don't forget to add some pretty ribbon and some sparkly embellishments to finish the tag. I hope you enjoyed my quick tag! Place them on your Christmas and party packages to make them extra special.

Hugs, Pammejo

Couture Creations Supplies:
CO723607 Wrapped in Joy Collection - Christmas Lyrics Embossing Folder
CO721957 Self Healing Cutting Mat
CO721961 Foam Mounting Tape
CO721956 Precision Scissors
CO721984 Double Sided Tape
CO721996 Crystal Self-Adhesive Gemstones
CO723061 Sponge Daubers

Friday, November 29, 2013

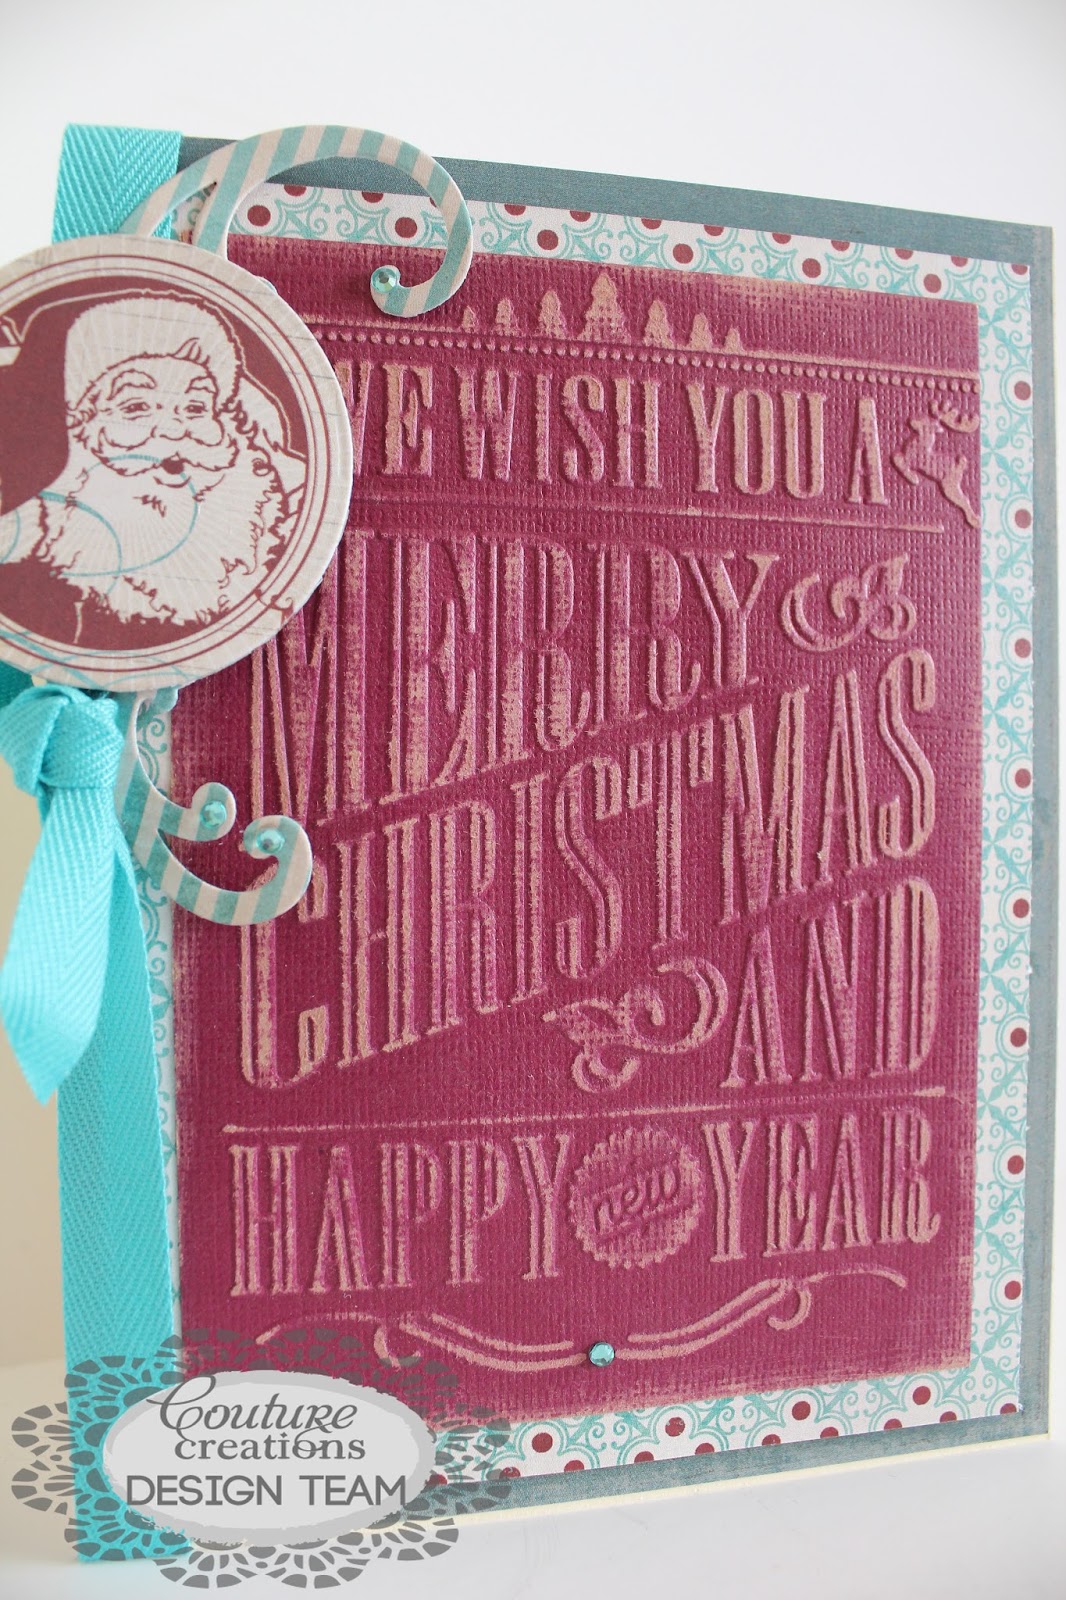
Christmas Lyrics Card by Pam Bray


Hi! Pam here today sharing a card that I created with the Couture Creaitons Christmas Lyrics Embossing Folder, from the NEW Wrapped in Joy Collection, and the Sophia Eberjey Die.


I began by embossing a piece of burgundy cardstock with the Christmas Lyrics Embossing Folder.


 I then lightly sanded the embossed cardstock with the Couture Creations Sanding Block.


I placed a piece of dark teal Distress cardstock on top of a cream colored card base. I added Foam Mounting Tape to the back of the embossed Christmas Lyrics cardstock and affixed that to a piece of pattern paper.


I die-cut two fun Santa embellishments from pattern paper using the Couture Creations Circle Nesting Dies.


 I used the beautiful Eberjey Die to cut a pretty flourish embellishment from a piece of patterned paper.


I wrapped some teal twill ribbon around the card and loosely tied a bow. I adhered the Eberjey die-cut and attached one of the die-cut Santa embellishments on top of the teal ribbon with Couture Creations Double Sided Tape.


Add some Couture Creations Foam Mounting Tape to the back of the second Santa die-cut and place it on top of the first Santa die-cut to create a layered embellishment. Tie the teal ribbon into a bow that it is closer to the bottom of the Santa embellishment. Trim the ribbon with Precision Scissors.


I added Couture Creations Seaspray Self-Adhesive Gemstones to the top of the Eberjey die-cut and one at the bottom of the embossed Christmas Lyrics piece of cardstock. I hope you check out the Wrapped in Joy Collection!
Hugs, Pammejo


Couture Creations Supplies: 
CO723607 Wrapped In Joy Collection Christmas Lyrics Embossing Folder
CO723040 Circle Nesting Dies
CO722502 Sophia Eberjey Decorative Die
CO721989 Gemstones Seaspray
CO721957 Self Healing Mat
CO723039 Precision Trimmer
CO721956 Precision Scissors
CO721984 Double Sided Tape
CO721961 Foam Mounting Tape
CO723060 Sanding Block