Wednesday, September 11, 2013

Happy Birthday Layout with Pam


Hi! Pam here today sharing a Happy Birthday layout I made using some fabulous dies and embossing folder from Couture Creations.  I love the embossing folders! They emboss so beautifully, the deep etched design of each folder yields a fantastic impression.


The "Happy Birthday" strip was part of a patterned paper I selected for this page. I wanted to use the Couture Creations Fudge Embossing Folder with it, so I first ran the strip through my embossing machine and then flipped it over and ran it through my embossing machine on the other side.


Once I had my strip embossed, I used my Couture Creations Sponge Dauber and a bit of ink to go over the top of it. I thought it helped to pop the embossed image.

After I had my distressing done on the Happy Birthday Strip, I added it to the top of my layout using Couture Creations Double-Sided Tape and placed some embellishments onto the page with Couture Creations Foam Mounting Tape.

I used the same technique on my rectangular pattern papers prior to placing them on my page.


Using the Couture Creations Sunflower Nesting Dies and Circle Nesting Dies, I made a layered piece to place under my photo.  


 It is an easy way to make your photo pop!


Hugs, Pammejo
Couture Creations Supplies:
CO723047 Nesting Dies - Scallop Rectangles
CO723040 Nesting Dies - Circles
CO723212 Nesting Dies - Sunflowers
CO723275 Fresh and Fun Collection - Fudge Embossing Folder
CO723525 Endless Dreams Decorative Dies - Hanging Sign
CO721994 Pink Diva Self Adhesive Gemstones
CO721956 Sharp Point Scissors
CO721961 Foam Mounting Tape
CO721986 Handheld Essentials
CO721957 Cutting Mat
CO723061 Sponge Daubers

Monday, September 9, 2013

Bright and Beautiful Birthday Card with Gloria

Hello everyone! Gloria here today. I have a bright and sunny card to share.


I love the bold colors mixed with black and white, and the "chalkboard" sentiment is just icing on the cake!


To create this card, first rub ink onto the Passion Embossing Folder from the Fine Designs Collection. Make sure to apply ink to the inside of the folder on the section that contains the black Couture Creations logo, as shown. If you don't care for the "watercolor" look, you can use a brayer to apply the ink. If you want a more "distressed" look, use the ink pad directly on the folder. Place white cardstock into the folder and emboss. Make sure to wash your folder right away with warm water.


Remove your paper from the folder and use a heat tool to make sure the ink is dry. Rub chalk pastels over the raised embossing. I chose a bright yellow chalk. Use your finger or a paper towel to buff the chalk. Use a gentle touch.


Next, create the flower. I used the Couture Creations Roses Nesting Dies.


Cut one of each size rose from yellow cardstock. Ink the edges with the same ink you used on the embossing folder. Rub the surface of each flower with the chalk pastel. Lightly spray each flower with spray mist (or water) and crumple them.


Once the flowers are dry, uncrumple them and cut slits between each petal. Gently bend each petal. Stack the flowers together, adhering them with glue.


Shape the rose as you attach each layer. The combination of the chalk and the spray mist gives the paper a rich, velvet texture.


Create the sentiment by stamping a greeting onto black cardstock with white or watermark ink. Heat emboss with white embossing powder. Use the Couture Creations Rectangle Nesting Dies and Scallop Rectangle Nesting Dies to cut out the sentiment as shown.


Attach your sentiment to the card with Foam Mounting Tape.

Thanks for joining me today!

Couture Creations Supplies:
CO723046 Nesting Dies  - Rectangle
CO723047 Nesting Dies  - Scallop Rectangle
CO723218 Premium Nesting Dies  - Roses
CO723251 Fine Designs - Passion Embossing Folder
CO721956 Sharp Point Scissors
CO721986 Handheld Essentials - Embossing Tool
CO721965 Double-Sided Tape
CO721963 Foam Mounting Tape
CO721957 Cutting Mat

Friday, September 6, 2013

Passion Embossing Folder Week - Die-Cut Inlay Card with Gloria

Hello, it is Gloria with you! This week the CSW Team is sharing creations using the Couture Creations Passion Embossing Folder. Here is what I made for you.


I am always on the hunt for NEW embossing folder techniques, and I wanted to give the die-cut inlay technique a try.

To create the card follow these steps:
1. Make a 5x5 inch card from blue cardstock.

2. Trim green patterned paper slightly smaller than the card front and set aside.

3. Trim white cardstock to 5x7 inches (to fit the embossing folder.

4. Place small die cuts onto the front of the white cardstock and tape into place with repositionable tape. Die-cut the white cardstock and set aside. (You won't need the die-cut shapes. You want the cardstock piece with the "holes.")

5. Die-cut the same shapes from dark blue and maroon cardstock. (I chose the Couture Creations Decorative Dies from the Endless Dreams Collection: Baby Dove and Magical Butterfly.
 

6. Make sure that the die-cut shapes fit into your holes on the white cardstock and that you can trim the cardstock to the correct size. Remove the shapes and set them aside.


7. Emboss the white cardstock with the Passion Embossing Folder. (If you wish, you can also emboss the die-cut "inlays.")


8. Trim the white cardstock to slightly smaller than the green designer paper. Using maroon ink (Clearsnap Colorbox Archival Dark Cherry), buff the edges of the embossed paper.

9. Attach the white embossed cardstock to the green designer paper, then wrap a length of green seam binding around the panel and secure. Attach the panel to the card front.

10. Using a clear glue, place the colored die cut shapes into the holes in the embossed cardstock as shown. The die-cut shapes are "inlaid" with the embossed paper. Plus you can see the green designer paper peeking through!


11. Stamp a sentiment with the Dark Cherry ink and cut it out with Couture Creations Square Nesting dies. Mat with dark blue cardstock. Attach to the card with foam tape.


12. Finish the card with a green bow made from seam binding. Attach a blue button and some twine to the top of the bow. Line your card with white cardstock.

For a twist on this folder:


I have created another project with this folder, using an ink technique. To see the tutorial, click HERE.

To see what the team has made, check here:
Pam
Patti
Dana

Thanks for looking!
Gloria (Scraps of Life)

Couture Creations Supplies:
CO723251 Fine Designs Collection - Passion Embossing Folder
CO723042 Square Nesting Dies
CO723408 Endless Dreams Baby Dove
CO723412 Endless Dreams Magical Butterfly
CO721962 Foam Mounting Tape
CO721957 Cutting Mat
CO721986 Handheld Essentials
CO723039 Precision Trimmer, Pink
CO721956 Sharp Point Scissors
CO723061 Sponge Daubers

Other: Cardstock: WorldWin Papers Premium White, Cut Mates Blue Potatoes, Grape Jelly; Designer paper: Echo Park For the Record 2 Documented; Ink: Clearsnap Colorbox Archival Dark Cherry; Stamp: Papertrey Ink Stylish Sentiments Birthday; Ribbon: Really Reasonable Ribbon (moss seam binding); Twine: craft store; Button: unknown; Adhesive: Aleene's Tacky Glue

Thursday, September 5, 2013

Passion Embossing Folder Week - Passion Card with Dana


Hi! Dana here today sharing a card for the Passion Embossing Folder feature this week. I wanted to create a passionate card so I started with a deep red cardstock from the Core'dinations Whitewash Collection that I embossed with the Passion Embossing Folder. I then sanded the embossed cardstock with my Couture Creations Sanding Block to reveal the red color core for a dramatic effect.

I applied a rub-on and a key to a rectangular piece of the same cardstock and sanded the edges with my  Sanding Block, a fun alternative to inking. I embellished the corners with Vintage Gold Self Adhesive Gemstones and attached the piece to my card with Foam Mounting Tape.

Thanks for stopping by today! Stop by tomorrow to see Gloria's beautiful card!
~Dana

Couture Creations Supplies:
CO723251 Fine Designs Collection - Passion Embossing Folder
CO721990 Vintage Gold Self Adhesive Gemstones
CO721963 Foam Mounting Tape
CO723060 Sanding Block

Wednesday, September 4, 2013

Passion Embossing Folder Week - Love the Moment with Pam


Hi! Pam here today. I "love" the moment because it is my turn to share my card...just a little play on words, hee, hee, hee. I want to share the beautiful Passion Embossing Folder from Couture Creations with you today...perfect folder for my "Love the Moment Card" don't you think?


Here is a closer look at the Passion Embossing Folder on Core'dinations Distress Cardstock. After I ran the folder through my embossing machine, I lightly sanded it with my Couture Creations Sanding Block to expose the kraft core of the paper.


I hope you'll stop by again to check out the other fabulous projects using the Couture Creations Passion Embossing Folder this week!

Hugs, Pammejo

Couture Creations Supplies:
CO723251 Fine Designs Collection - Passion Embossing Folder
CO723060 Sanding Block
CO721986 Handheld Essentials
CO723061 Sponge Dauber

Tuesday, September 3, 2013

Passion Embossing Folder Week - Blue Passion with Patti

Hi, Patti here sharing a project created using the Couture Creations Passion Embossing Folder from the Fine Designs collection.. I love the intricate detail of this folder, it looks like morning glory vines to me! So I wanted to show as much of the actual folder as possible without covering it with lots of embellishments.

To do that, I wanted to make the actual embossed area a little more special, so I began by coloring in sections with Zig markers. I used blue, yellow and green in lighter hues. Then I used a blue ink pad and went over the entire area.

After that, I used embossing ink and sprinkled "WOW" Neutral Ultra Shimmer Embossing Powder on it and heat embossed the entire area for a real shimmery look! To top it off, I added light blue grosgrain ribbon and a rub-on sentiment that matched perfectly! I think the color combo is striking!


Thanks so much for stopping by and I hope you enjoyed seeing my card!

Couture Creation Supplies:

Other Supplies:  Cardstock: Worldwin (DoubleMates Terrific Teal, ColorMates Natural); Rub-ons:  My Mind's Eye (Misc. Sentiments); Ink:  Anna Griffin (blue); Markers: Zig (blue, green, yellow); Embossing Powder: WOW (Neutral Ultra Shimmer); Miscellaneous: Blue Grosgrain Ribbon, Pop Dots.

Monday, September 2, 2013

Passion Embossing Folder Week - Gelato Watercolor Effect with Dana

Welcome to the Passion Embossing Folder Feature Week! We're highlighting projects created with the gorgeous Couture Creations Passion Embossing Folder every day this week. Each member of the CSW Distributors Design Team has created a card using the Passion Embossing Folder and we can't wait to share our designs with you. To start the week off, we're sharing a card tutorial! Enjoy!


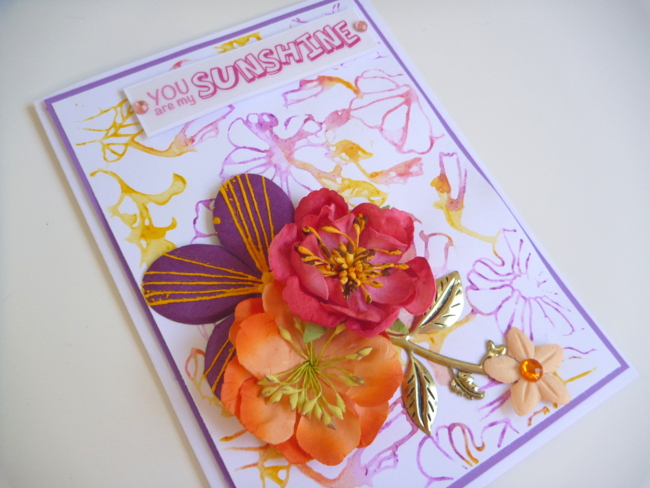
Hi! Dana here today sharing a fun technique using the Passion Embossing Folder, from the Couture Creations Fine Designs Collection, and Faber-Castell Design Memory Craft Gelatos to create a beautiful watercolor effect.


Step One: Gather several colors of Gelatos, a piece of white cardstock, a mister filled with water and the Passion Embossing Folder.


Step Two: Lightly mist the back inside portion of the Passion Embossing Folder with water and apply Gelatos color to the raised floral pattern. Note: I used Raspberry, Watermelon, Metallic Melon and Banana Gelatos.


Step Three: Carefully place a piece of white cardstock on top of the colored side of the embossing folder, fold the top half of the embossing folder down and apply pressure to transfer the color to the cardstock.


Step Four: Remove the cardstock from the embossing folder and set aside to dry. Trim the cardstock to fit onto a card base and embellish to finish.


Thanks for stopping by today! Please stop by every day this week for more projects featuring the Passion Embossing Folder!

~Dana

Couture Creations Supplies:
CO723251 Fine Designs Collection - Passion Embossing Folder
CO721995 Pink Flamingo Self Adhesive Gemstones
CO721963 Foam Mounting Tape