Monday, September 30, 2013

Wrapped in Joy Week - Faux Chalkboard Effect with Tracey Cooley

Hi Creators! Tracey Cooley, Couture Creations Special Project Designer, here with another CHA card creation. Chalkboard is all the rage at the moment and the Couture Creations Wrapped In Joy 5x7 Christmas Carols Embossing Folder is perfect for the faux chalkboard effect.


This look is so simple to achieve! All you need is some black cardstock, the Christmas Carols Embossing Folder and a white gel pen. Cut a 5"x7" card base from black cardstock and set aside. Cut a 4.75"x6.75" mat from black cardstock and emboss with the Christmas Carols Embossing Folder.


Then simply trace around all aspects of the embossed image with a white gel pen. Adhere your embossed and traced mat to your card base and then, to blend it in, trace around the edge of the mat.
I know that I have shown you this technique before but it is so simple and so effective and I really wanted to show you it with this particular embossing folder.
Below is the same technique with the A2 Christmas Lyrics Embossing Folder only I reversed the colors. I stamped the embossed cardstock with a script stamp before removing my cardstock from the embossing folder. I then traced the edges with a fine tip felt pen.

 
Keep on Creating!
~Tracey
 
Couture Creations Supplies:
CO723597 Wrapped In Joy Collection - 5x7 Christmas Carols Embossing Folder
CO723607 Wrapped In Joy Collection - A2 Christmas Lyrics Embossing Folder
CO721965 18mm Double-Sided Tape

Friday, September 27, 2013

Hugs and Kisses by Pam Bray

Hi! Pam here today. I wanted to share with you my Hugs and Kisses card I made using the Couture Creations Confetti Embossing Folder and Picture Frame Nesting Die. First we have to a bit of embossing to do, so gather a stamp, a piece of white cardstock and embossing ink. Stamp the image on to the white cardstock and, taking three different colors of embossing powder and a small spoon, carefully put a bit of each color onto the stamped image. Tip: I do this by going lightest to darkest, making sure that I have a tray for each color and shaking the excess embossing powder off prior to going to the next color.  Using your embossing gun, heat set your embossing powder.


Now here's the fun part! Take the embossed piece of cardstock and place it in a favorite Couture Creations embossing folder. I used the Confetti Embossing Folder from the Couture Creations Elegance Collection.


 Here is a closer look of the beautiful embossed cardstock.


I added some Couture Creations Foam Mounting Tape to the back of the card and then adhered it to my card base.


I ran the Couture Creations Picture Frame Nesting Die through my die-cutting machine, added a stamped white oval piece behind it and placed it to the top of my card front once I had my ribbon tied around my card.

I added a few embellishments to the front of my card once I had the frame in place. 

Hugs,
Pammejo

Couture Creations Products:
CO723287 Elegance Collection - Confetti Embossing Folder
CO723215 Picture Frame Nesting Die
CO721963 Foam Mounting Tape
CO721985 Double-Sided Tape
CO721956 Sharp Point Scissors
CO721957 Cutting Mat
CO721986 Handheld Essentials
CO721990 Self-Adhesive Gold Gemstones

Wednesday, September 25, 2013

Get Rusty with Gloria

Hello everyone! Gloria here today sharing a fall-themed card.

I created a faux patina effect for this card. It is a fun way to get more use out of your folders! I used the Endless Embossing Folder from the All Occasions Collection.


Use a brayer to add ink to the embossing folder. I used a selection of fall colors of dye ink. Make sure you add ink to the inside of the folder, on the section containing the black Couture Creations logo. Place cream cardstock into the folder and emboss. Wash your folder to prevent staining. Use a heat tool to make sure the ink on the cardstock is totally dry.


Create a "patina" by using a foam or sponge ink applicator to ink over the raised areas of the embossed paper with green, blue, and dark brown ink, in that order. Allow to dry. You may use a heat tool to dry the ink if you wish.


Ink some of the raised areas with watermark or clear embossing ink. You only want to heat emboss a few areas to create a "rusted" look on your card. Emboss with metallic embossing powder. I created my own "rust" powder by combining several powders together. Trim the paper to size and use it to create a card.


I cut out the sentiment with the Rectangle Nesting Dies and Scallop Rectangle Nesting Dies and attached it to the card with Foam Mounting Tape.

Thanks for joining me today!

Couture Creations Supplies: 
CO723046 Rectangle Nesting Dies
CO723047 Scallop Rectangle Nesting Dies
CO723294 All Occasions Collection - Endless Embossing Folder
CO721956 Sharp Point Scissors
CO721986 Handheld Essentials - Embossing Tool
CO721965 Double-Sided Tape
CO721963 Foam Mounting Tape
CO721957 Cutting Mat

Monday, September 23, 2013

Enjoy the Journey Card with Dana


Hi! Dana here today sharing a fun layered card that I created with the Celebrate Embossing Folder from the Couture Creations Elegance Collection and the Couture Creations Fleur-De Frame Nesting Die. I'm trying to hold on to Summer for as long as I can with this bright and cheerful card. I'm hoping to squeeze in a couple more exciting journeys before the weather gets too cold.


The flourish pattern on the Celebrate Embossing Folder represents the wind and the Fleur-De Frame a fluffy cloud, a fun layered backdrop for the hot air balloon sticker.

Thanks so much for stopping by today!
~Dana

Couture Creations Supplies:
CO723283 Elegance Collection - Celebrate Embossing Folder
CO723050 Fleur-De Frame Nesting Dies

Other Supplies: Cardstock: Core'dinations; Patterned Paper: Basic Grey; Stickers: Paper House Productions; Ribbon: Offray

Friday, September 20, 2013

Smile with Pam Bray


Hello! Pam here today sharing with you my "Smile Card" using the Couture Creations Petal Pleasures Embossing Folder from the Fresh & Fun Collection. To begin with I went to the archives of my mass paper stash and found some Bo Bunny papers that I had forgotten about....I am sure if you are a paper crafter/scrapbooker you understand what I mean by the "archives" of paper stashes....anyway...I began by placing my patterned paper on top of a 4" x 5 1/2" piece of kraft paper.


I ran my Couture Creations Petal Pleasures Embossing Folder through my die-cutting machine using Core'dinations Color Core Cardstock. Once I had accomplished this, I sanded it lightly with my Couture Creations Sanding Block, and adhered it to the top of my paper with my 1/4" Double-Sided Tape. I placed small Clear Gemstones from Couture Creations in the centers of each of my flowers.


Add a fun strip of coordinating patterned paper and a sticker border to the center of the Petal Pleasures cardstock prior to placing your fussy cut flowers on to your card front with Couture Creations Foam Mounting Tape.

I hope you enjoyed my card today and that it made you smile.
Hugs, Pammejo

Couture Creations Supplies:
CO723273 Fresh & Fun Collection - Petal Pleasures Embossing Folder
CO721996 Clear Gemstones
CO721985 Double-Sided Tape - 1/4"
CO72`963 Foam Mounting Tape
CO721965 Sharp Point Scissors
CO721957 Cutting Mat
CO721986 Handheld Essentials
CO723060 Sanding Block

Other Supplies:
Bo Bunny Pattern Paper/Stickers
Blue Core'dinations Cardstock
Brown Satin Ribbon

Wednesday, September 18, 2013

Quick and Easy Embossing Designs by Gloria Stengel

Hello! It is Gloria with you today. I am sharing a "quick and easy" card! When I collect a new embossing folder, the first thing I do is emboss it, using whatever cardstock I have close by. I also will emboss various types of cardstock to get a feel for how the impression will look with different weights and textures of cardstock. As a result, I collect stacks of embossed patterns! It is easy to pair these embossed prints together to make quick cards!


To create this card follow these steps:

1. Make a 5 1/2 x 4 1/4 inch card from rust cardstock. Set aside.

2. Emboss metallic cardstock with the Extra Loren Embossing Folder from the Couture Creations Elegance Collection.

3. Using a Couture Creations Sponge Dauber, rub the metallic embossed cardstock with rust ink. Trim the panel to slightly smaller than the card front.

4. Emboss green cardstock with the Poetry Embossing Folder from the Couture Creations Elegance Collection.

5. Using a Couture Creations Sponge Dauber, rub the green embossed cardstock with green ink. Trim the panel to 4 3/4 x 3 inches and mat with rust cardstock. Attach to the left side of the embossed metallic cardstock.
 

6. Stamp a sentiment with brown ink and die cut with a Couture Creations Rectangle Nesting Die.

7. Mat the sentiment with a rectangle die cut with the Couture Creations Scallop Rectangle Nesting Die. Attach the sentiment to the other panels with Foam Mounting Tape.

8. Wrap twine around the embossed panels and secure. Attach the panels to the card front.

9. Tie a button onto the card with more twine.

You can create this same card with various embossed panels and stamps! Take a rainy afternoon to replenish your card stash with some quick and easy cards....using embossing folders, of course!

Thanks for looking!  
~Gloria (Scraps of Life)
 
Couture Creations Supplies:
CO723445 Elegance Collection - Extra Loren Embossing Folder
CO723285 Elegance Collection - Poetry Embossing Folder
CO723046 Rectangle Nesting Dies
CO723047 Scallop Rectangle Nesting Dies
CO721963 Foam Mounting Tape
CO721965 Double-Sided Tape
CO721956 Sharp Point Scissors
CO721957 Cutting Mat
CO723039 Precision Trimmer
CO723061 Sponge Daubers

Other: Cardstock: WorldWin Papers ColorMates Smooth and Silky Deep Terra-Cotta, ColorMates Original Light Totally Tan, Elan Metallics; Mocha Ink: Clearsnap, Colorbox Archival Tree Frog, Clearsnap Colorbox Chalk Burnt Sienna, Tsukineko Memento Rich Cocoa; Stamp: Stampin' Up; Twine: May Arts; Button: Unknown; Adhesive: Glue Dots Adhesive Dots

Monday, September 16, 2013

Song of the Sea Card with Dana


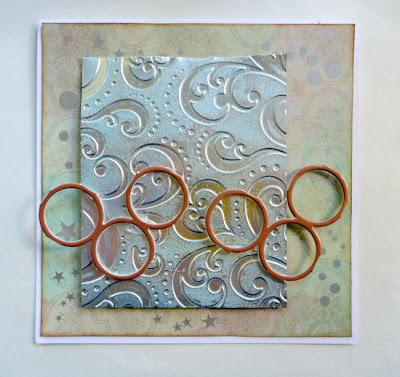
Hi! Dana here today sharing a card that features a piece of embossed aluminum today. I feel at home when I'm on the beach, and that was my inspiration for my project. I embossed a piece of aluminum with the Couture Creations Cheerful Embossing Folder, from the Elegance Collection, and added color with Lindy's Stamp Gang Madonna Robe Blue Gold Two-Toned Embossing Powder.


Step One: Add watermark ink directly to the inside of the Cheerful Embossing Folder, slip the piece of aluminum inside the folder and run the folder through an embossing machine. Remove the aluminum from the folder, sprinkle with embossing powder and heat to set. Note: If you are using an aluminum sheet, the metal will become very hot upon heating, so please be careful! Depending on which side of the embossing folder carried the watermark ink, either the embossed or debossed area will be colored.


Here is what my piece of aluminum looked like after embossing.


Step Two: Stamp a sentiment onto a piece of cardstock. Cut the sentiment from the cardstock with the Couture Creations Scalloped Oval Nesting Die. Apply ink to the sentiment using a Sponge Dauber and the metal die as a guide.


Step Three: Select a piece of patterned paper for the card base and randomly apply circles and stars from the Pink Paislee Luxe Rub-Ons Set.


Step Four: Assemble the base of the card. Add some chipboard pieces from the Pink Paislee Luxe Circles Set across the center of the card.


Step Five: Add an image, the stamped sentiment from Step Two and other embellishments to finish the card.

Thanks so much for stopping by today!

Couture Creations Supplies:
CO723282 Elegance Collection - Cheerful Embossing Folder
CO723045 Nesting Dies - Scallop Oval
CO723061 Sponge Dauber
CO721963 Foam Mounting Tape

Friday, September 13, 2013

Layered Medallion Celebration Card with Patti

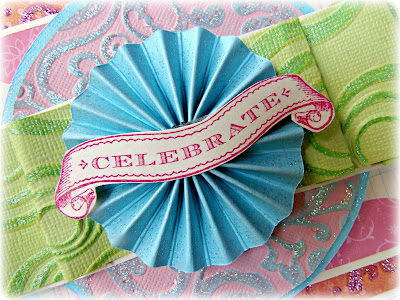
Hi! Patti here today sharing a celebration card that features a layered medallion. I wanted to create a dimensional card with some of the folders, and I wanted a blinged up look, so I used several Couture Creations embossing folders and then highlighted the raised areas with Glitzin' Glamour Glitter Glue! I used lots of Foam Mounting Tape too!
Here's my card!

I used some Core'dinations Glitter Cardstock and made a little medallion and placed a stamped title on it. I placed it on a ribbon pleated strip of Core'dinations Pastel Cardstock that I inked green. I placed a circle underneath the pleated cardstock that I embossed with the Couture Creations Exotic Embossing Folder and highlighted with Crystalina Glitzin' Glamour.


Here you see some close-up detail!


Here you can see the folded cardstock under the medallion.


The background of the card is a piece of cardstock that I also embossed with the Exotic Embossing Folder and highlighted with more Glitzin' Glamour in Lilac! This was lots of fun to do and it looks really festive too!

Thanks for stopping by today!
~Patti

Couture Creations Supplies:
CO723256 Fine Designs Collection - Exotic Embossing Folder
CO723276 Fresh and Fun Collection - Nuevo Embossing Folder
CO721975 Glitzin' Glamour - Lilac
CO721971 Glitzin' Glamour Cyrstalina
CO721965 Foam Mounting Tape

Wednesday, September 11, 2013

Happy Birthday Layout with Pam


Hi! Pam here today sharing a Happy Birthday layout I made using some fabulous dies and embossing folder from Couture Creations.  I love the embossing folders! They emboss so beautifully, the deep etched design of each folder yields a fantastic impression.


The "Happy Birthday" strip was part of a patterned paper I selected for this page. I wanted to use the Couture Creations Fudge Embossing Folder with it, so I first ran the strip through my embossing machine and then flipped it over and ran it through my embossing machine on the other side.


Once I had my strip embossed, I used my Couture Creations Sponge Dauber and a bit of ink to go over the top of it. I thought it helped to pop the embossed image.

After I had my distressing done on the Happy Birthday Strip, I added it to the top of my layout using Couture Creations Double-Sided Tape and placed some embellishments onto the page with Couture Creations Foam Mounting Tape.

I used the same technique on my rectangular pattern papers prior to placing them on my page.


Using the Couture Creations Sunflower Nesting Dies and Circle Nesting Dies, I made a layered piece to place under my photo.  


 It is an easy way to make your photo pop!


Hugs, Pammejo
Couture Creations Supplies:
CO723047 Nesting Dies - Scallop Rectangles
CO723040 Nesting Dies - Circles
CO723212 Nesting Dies - Sunflowers
CO723275 Fresh and Fun Collection - Fudge Embossing Folder
CO723525 Endless Dreams Decorative Dies - Hanging Sign
CO721994 Pink Diva Self Adhesive Gemstones
CO721956 Sharp Point Scissors
CO721961 Foam Mounting Tape
CO721986 Handheld Essentials
CO721957 Cutting Mat
CO723061 Sponge Daubers

Monday, September 9, 2013

Bright and Beautiful Birthday Card with Gloria

Hello everyone! Gloria here today. I have a bright and sunny card to share.


I love the bold colors mixed with black and white, and the "chalkboard" sentiment is just icing on the cake!


To create this card, first rub ink onto the Passion Embossing Folder from the Fine Designs Collection. Make sure to apply ink to the inside of the folder on the section that contains the black Couture Creations logo, as shown. If you don't care for the "watercolor" look, you can use a brayer to apply the ink. If you want a more "distressed" look, use the ink pad directly on the folder. Place white cardstock into the folder and emboss. Make sure to wash your folder right away with warm water.


Remove your paper from the folder and use a heat tool to make sure the ink is dry. Rub chalk pastels over the raised embossing. I chose a bright yellow chalk. Use your finger or a paper towel to buff the chalk. Use a gentle touch.


Next, create the flower. I used the Couture Creations Roses Nesting Dies.


Cut one of each size rose from yellow cardstock. Ink the edges with the same ink you used on the embossing folder. Rub the surface of each flower with the chalk pastel. Lightly spray each flower with spray mist (or water) and crumple them.


Once the flowers are dry, uncrumple them and cut slits between each petal. Gently bend each petal. Stack the flowers together, adhering them with glue.


Shape the rose as you attach each layer. The combination of the chalk and the spray mist gives the paper a rich, velvet texture.


Create the sentiment by stamping a greeting onto black cardstock with white or watermark ink. Heat emboss with white embossing powder. Use the Couture Creations Rectangle Nesting Dies and Scallop Rectangle Nesting Dies to cut out the sentiment as shown.


Attach your sentiment to the card with Foam Mounting Tape.

Thanks for joining me today!

Couture Creations Supplies:
CO723046 Nesting Dies  - Rectangle
CO723047 Nesting Dies  - Scallop Rectangle
CO723218 Premium Nesting Dies  - Roses
CO723251 Fine Designs - Passion Embossing Folder
CO721956 Sharp Point Scissors
CO721986 Handheld Essentials - Embossing Tool
CO721965 Double-Sided Tape
CO721963 Foam Mounting Tape
CO721957 Cutting Mat